Sliding plates replacement
This instruction will guide you on how to replace the sliding plates. This instruction could also be used if you need to scrape you sliding plates or check the condition.
Sliding plates are a wear part that needs to be replaced when symptoms occur. For how long one pair of sliding plates last is all individual for each EVO Cleaner. It all depends on how heavy effected the telescope is in each program and how often the robot washes.
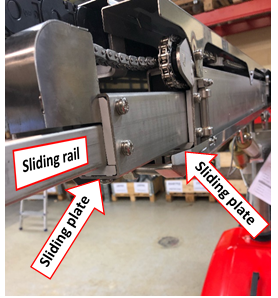
For more detailed information regarding the sliding plates, go to exploded view: Wide sliding plate (item 1) and Narrow sliding plate (item 3).
Necessary equipments: One PH3 screwdriver and one smaller screwdriver.
1. Start the robot.
- a. Place the boom horizontally.
- b. Run the telescope out about 40 centimetres.
- c. Then the arm out to about 90° or more, so it isn't in the way for you.
2. Take off the left side cover of the boom.
- a. Press the ”button/hole” that’s located at the rear part of the boom to unlock.
- b. While the ”button/hole” is held down, push the cover forward.
- c. Then lift the bottom part out a bit and now lift the cover straight up to detach.
3.Locate the current sliding plates.
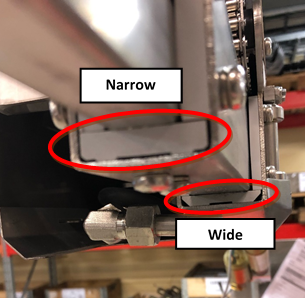
4.The outer narrower sliding plate is mounted with two screws underneath and the wider sliding plate is mounted with four screws underneath.


5. Remove the screws on one sliding plate first. Make sure that you don’t lose any spring washers. If we don’t use spring washers, the screw will go through the sliding plate and hit the sliding rail directly.
- a. If it’s hard to get the old plates out, you could dismount the plates on the sides/above as well for more space.
- b. If you remove the side plates you can use a hook to remove the bottom sliding plate.
6. Lift the telescopes sliding rail so you release some pressure against the sliding plate as you simultaneously take the smaller screwdriver in one of the screw holes underneath and tries to push the sliding plate outwards until you can grab it. If you dismount the side plates you can also get a hook of any kind and pull the plate out from behind.
- i. The wider plate could be a bit more difficult to get out. If so, you could also bend the plate out with something pointed from the triangle formed corner holes at the front as you can see in the picture.

7. Mount the new sliding plate with wax. The track with the wax must be up against the sliding rail and outwards, towards the arm so to say.
8. Mount the screws. Lift the sliding rail again, so we have as much space as possible and it even helps to match up the screw with the screw holes.


9. Now take the other sliding plate.
10. Repeat step 5. 6. 7. and 8.
11. Put the cover back on the boom.
- a. Begin at the top and make sure that all hooks are in each hole. Hold the bottom part a bit outwards.
- b. Push the bottom part inwards (against the boom).
- c. Push the cover backwards until it locks in.
