
Table of Contents
Screens
Here you can find information for each button for the most common screens.
Start screen
The robot is started by pressing the On/Off button. After about 30 seconds the operator panel has booted and begins to initialize the robot. Please wait a few seconds until the initialization is done and the start screen is shown.
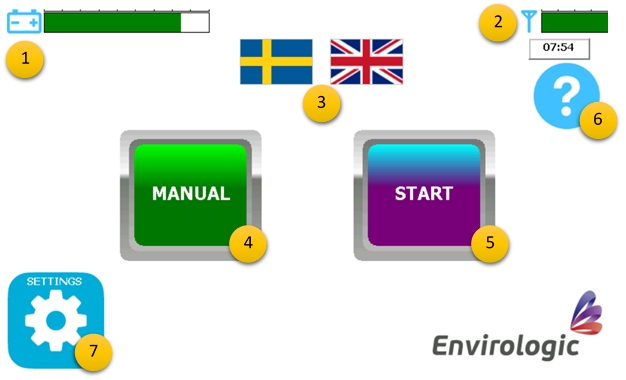 1. Battery status
2. Mobile signal status
3. Switch language (press one flag to select language)
4. Manual movement -mode
5. Start automatic wash -mode
6. Help button - Enable/disable (shown on all screens)
7. Settings (password required)
Manual screen
The manual screen will allow you to move each function, one at the time. Press any arrow to move the related function in the given direction. Use this screen when transporting the robot. The joystick does also work when this screen is displayed.
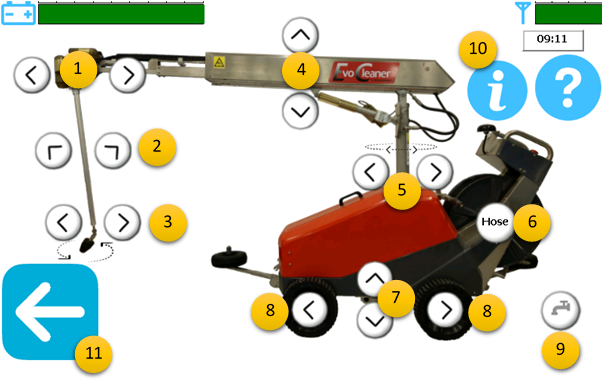 1. Telescope out/in
2. Arm out/in
3. Nozzle clockwise/counter-clockwise
4. Boom up/down
5. Tower left/right
6. Roll up the hose
7. Transport wheels down/up
8. Move robot forwards/backwards (double tap a direction to lock that motion. Must be manually stopped)
9. Open/close water valve
10. Information - Enable detailed view
<font inherit/inherit;;#000000;;inherit>11. Go back (start screen)</font>
<font inherit/inherit;;#ffffff;;inherit>.</font>
Information - 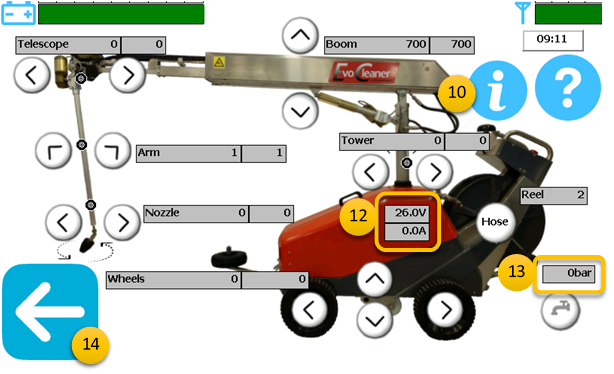 Detailed view (show exact positions for each motor, current position to the left and reference position to the right)
10. Information - Press to disable detailed view
12. Voltage status and ampere usage
13. Measured water pressure (bar)
14. Go back (start screen)
Settings screen
All programming is made from the settings screen. You do also access internet screen (1.) from here.
This screen is password protected to keep uneducated personnel from programming.
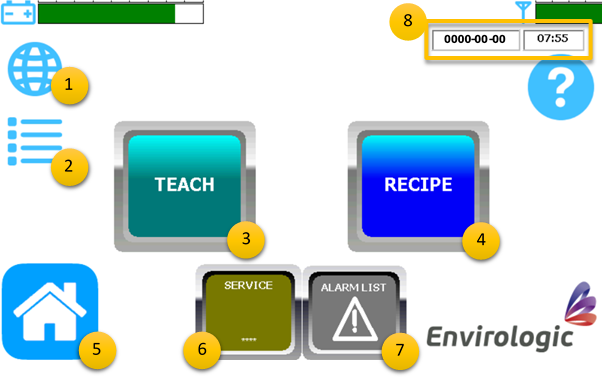 1. Internet screen - Enter phone number / Connect WiFi
2. File browser - Locations/Recipes/Programs
3. Teach - Create new location/programs (educated personnel only)
4. Recipe - Create new/edit existing recipe (educated personnel only)
5. Go back to start screen
6. Service - Authorised personnel only (password required)
7. Alarm list - List of recent alarms
8. Date / Time - Press to edit date or time
Internet screen
The EVO Cleaner must have a given number to be able to send a text message for finished wash or if an alarm occurs. This is where you add you phone number.
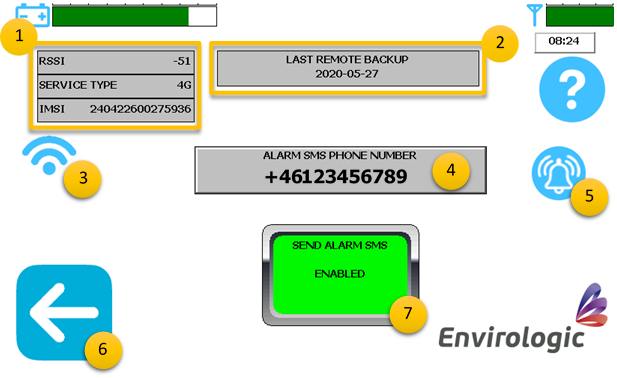 1. RSSI - Expected signal strength
<font inherit/inherit;;#ffffff;;inherit>….</font>Service type - 3G or 4G connection
<font inherit/inherit;;#ffffff;;inherit>….</font>IMSI - International Mobile Subscriber Identity
<font inherit/inherit;;#ffffff;;inherit>…</font>(unique SIM-card identification number)
2. Last remote backup - Last sent backup to our servers (new location, new program, new recipe)
3. WiFi settings (only on 2020 years model)
4. Enter phone number - Press link for more information
5. Triggers text message-test
6. Go back (settings screen)
7. Send alarm - Enable/disable the function