Table of Contents
Screen guide - Step by step
This instruction guides you on how to press on the screen through the entire process of programming, but also how to start the automated wash.
You will get better and better with the joystick for each program that you create. Aim to take your time to make new improved programs for the location you are going to wash, every time you get the opportunity until you are satisfied with the results. In this way you will become a better programmer and be more familiar with the robot which leads to better results for the wash and an even more efficient robot.
You can press on any of the pictures below for a bigger picture.
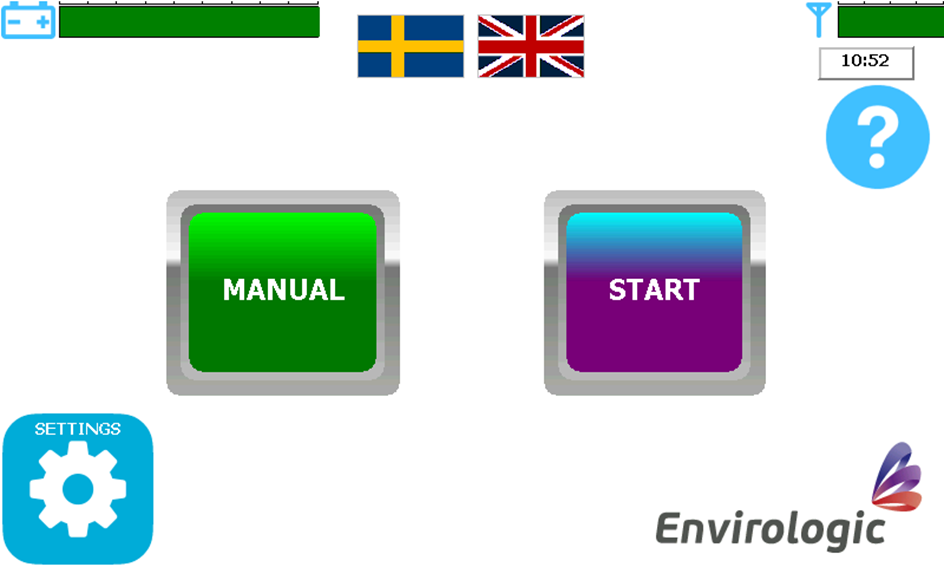
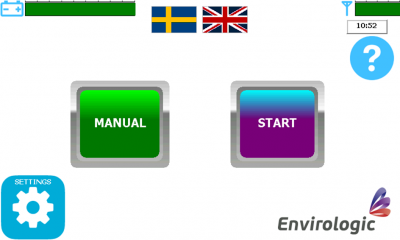
1. Start screen
At the top of the screen, you can choose between your native language or English.
You can get help and explanation of different buttons if you press ![]() . This question mark is available on all screens if there is any button or functions you are considering. Deactivate the help by pressing the
. This question mark is available on all screens if there is any button or functions you are considering. Deactivate the help by pressing the ![]() -button again.
-button again.
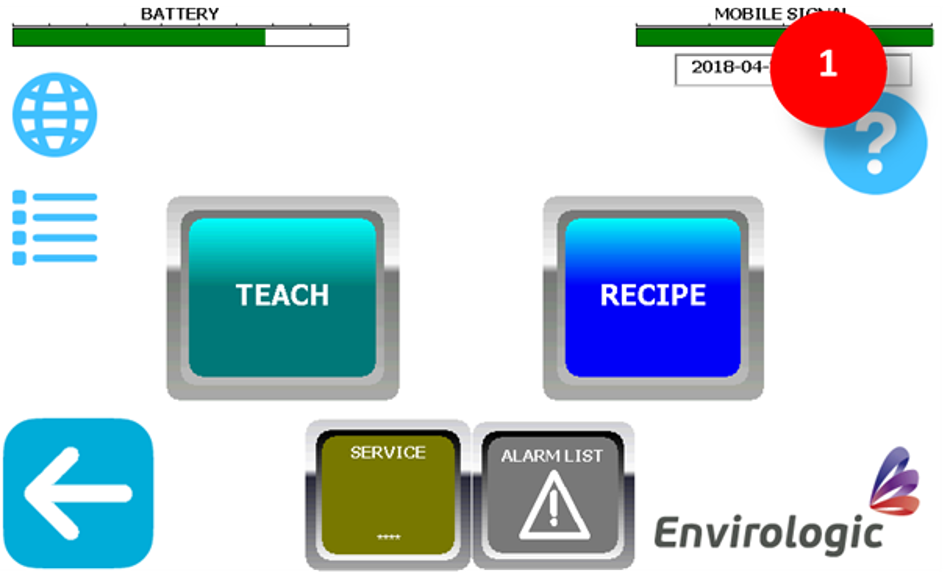
Everything you teach the robot (locations/programs/recipes) is done through “Settings”.
- Tap “Settings” (gear in the bottom-left corner).
- Enter password then “Enter”.
2. Settings
From this screen you can choose whether you want to create a new location, new program or new recipe. In this step, we are going to show you how to create a new location.
You can also go to the internet screen from settings and enter your phone number . You’ll then receive text messages when the robot, for example, is finished with a wash. You enter your phone number by pressing the blue globe ![]() up in the top left corner .
up in the top left corner .
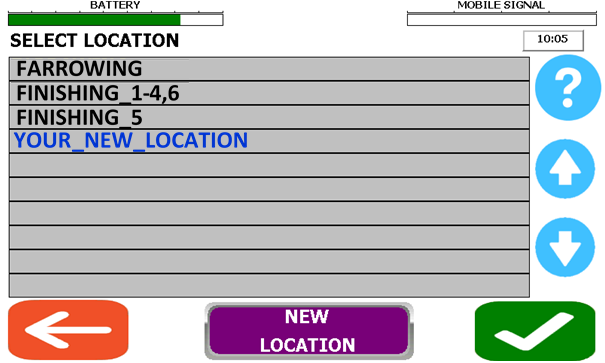
- You create a new location or new program by pressing the TEACH -button.

3. Teach a new location or program
In this step, choose if you want to make a new location or a new program. Go to step 1. if you want to make a new location. Go to step 2. if you want to make a new program in an already existing location.
- To create a new location, press on the purple button at the bottom; “New location”.
- New location means that the robot will read where the markers are and measure the total distance. Prepare the number of markers you need and make sure that the marker brackets are in the same place at each pen.
<font inherit/inherit;;#ffffff;;inherit>.</font>
- To create a new program in an already existing location; select the existing location by tapping on the location name in the list (blue text = selected).
- Then confirm with the green checkmark
 at the bottom right corner.
 - If you choose to make a new program in an already existing location, you can proceed to step “9. Give the program a name”.

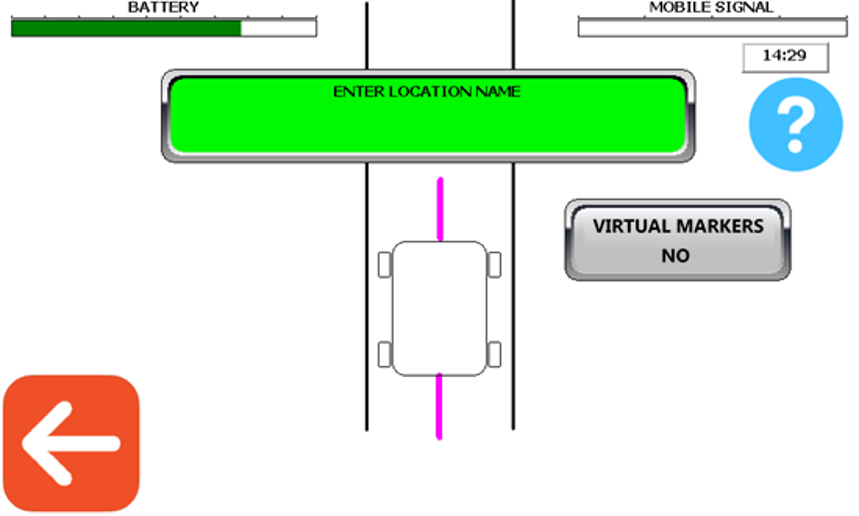
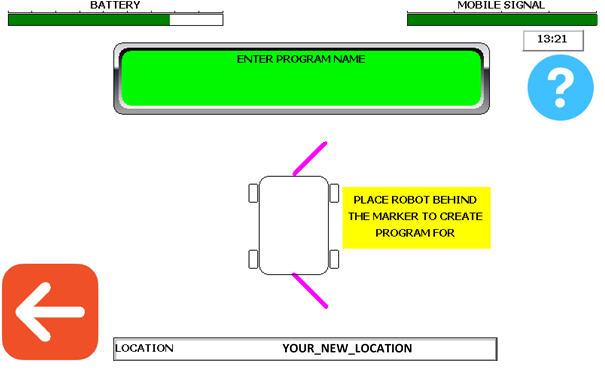
4. Name the location
In this step, you are going to name the location to the same name as you normally call this room. Optionally give a name that fits all locations that are identical.
You do also have the option to choose if you want to use virtual markers. If you only using physical markers and don't use virtual markers, go directly to step 2).
- If you want to use virtual markers, press the grey button “virtual markers” before naming the location.
- To learn more about virtual markers, read the document “Virtual markers ”.
<font inherit/inherit;;#ffffff;;inherit>.</font>
- Press the green square and name the location. Confirm with “Enter”
- <font 14px/inherit;;inherit;;inherit>If you have rooms that are identical, you can use the same location for all of them as long as you place the markers same in all of the rooms. Example: You have 6 rooms. You can name them for example to “Room 1-6”. Alternatively, “Room 1-3” and the next location to “Room 4-6” If these rooms are mirror-facing or in any other way differ to the others. “Room 1-4,6” is another option if just “Room 5” differs. If so, “Room 5” will have its own location.</font>
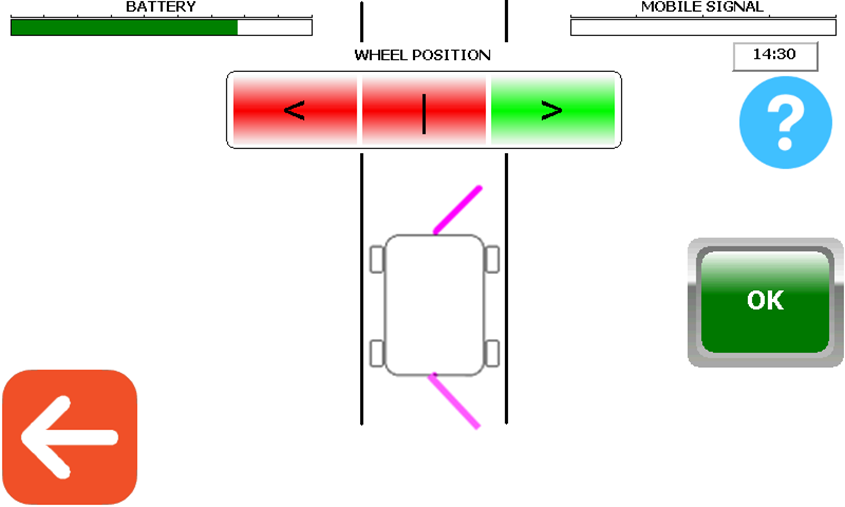
5. Guidance wheels
Place the guidance wheels manually towards the wall where the markers are placed at. Pull the back wheel straight back to unlock. Push the back wheel forward to lock it in the angle you are satisfied with. The magnetic-sensor shall also be pointed towards the markers!
When the guidance wheels are angled the robot going to drive in that direction and be close to the markers.
- Select if the guidance wheels shall steer to the left or right.
- Confirm with ”OK”.
The example below shows that the right side is selected.
This isn’t a programming part. This is just a reminder for later, so you know which side the wheels must steer to.
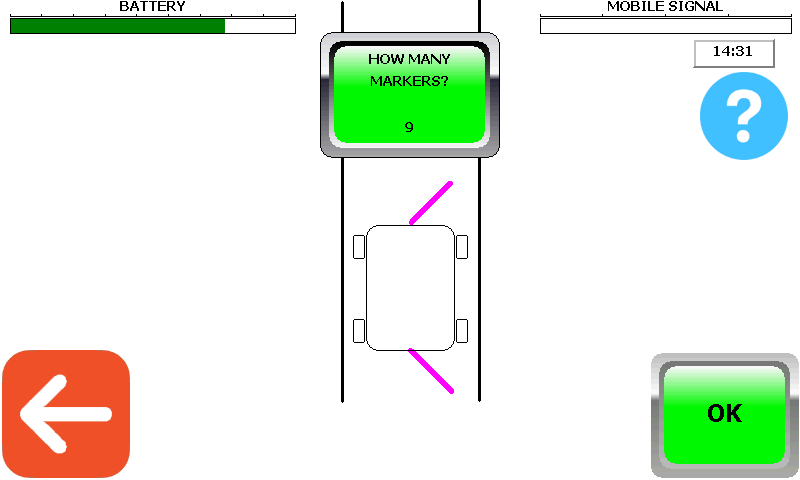
6. Number of markers
Before you begin the following steps, make sure that the robot is positioned correctly in the aisle. That the guidance wheels are in the right direction (towards the markers); the magnetic-sensor is placed before the first marker (up to 1 m before); that the magnetic-sensor points towards the markers (left or right); and that the magnetic-sensor is adjusted so it can sense the markers (max 10 cm from the marker).
How many physical markers are placed in the aisle?
- Tap the green square to enter how many physical markers there is in the aisle.
- Enter the number of physical markers then “Enter”.
- If you are using Virtual markers , you must enter the number of physical markers (do not count with the virtual markers) you have set up in the aisle.
- Now you will see the “OK”-button in the bottom right corner.
Note; when you press “OK”, the robot will start running forward to read where the markers are located. So, make sure you have made the preparations as above.

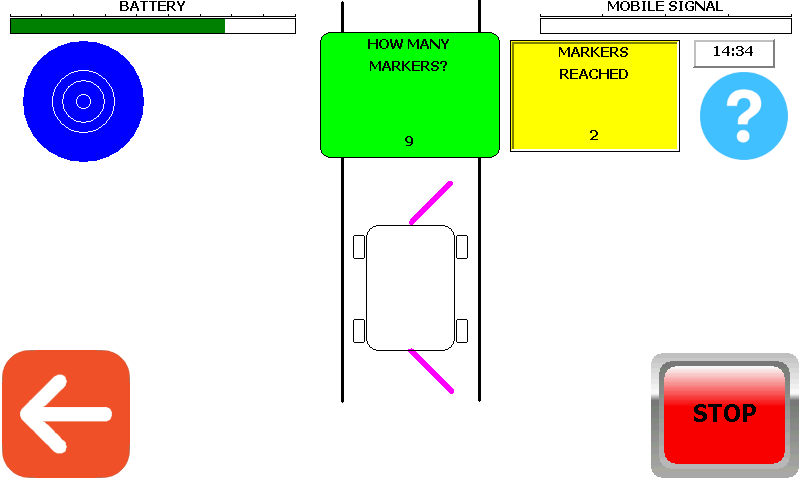
7. Count markers
Now that the robot has begun to drive forward, it’s important to follow the robot all the way down the aisle to make sure the sensor senses all the markers.
The blue symbol in the upper left corner ![]() means that the sensor detects a marker (or something else that’s magnetic).
means that the sensor detects a marker (or something else that’s magnetic).
The yellow square shows how many markers the robot have sensed.
- Make sure this symbol lights up at each magnetic marker and not somewhere else.
- During the run, make sure that the robot doesn't get stuck so the wheels starts to spin on the same place while the robot has stuck temporarily. This will make the robot count the pulses incorrectly. If this happens, press “STOP”, adjust a parameter and start over.
- Check so the robot has counted the marker in the yellow square and at the end, that it has counted the same number of markers that you specified. When the EVO Cleaner sensed the last marker, the robot will come back to the first marker.
- If the robot misses a marker, press “STOP” and start over from first marker.

8. Create a program
When the robot has sensed all the markers, you will return to settings. You have now created the location that you now want to create programs for.
- From setting screen, go to ”TEACH”.
- Select the location in the list that the program will be created for, then confirm with the green button
 .
.
If you want to remake a program, click here.
9. Give the program a name
The name of the program shall describe the specific washing area that this program washes.
Examples of names are: “Floor Right, Floor Left, Wall Right, Wall Left” etc.
Note that the robot shall now be positioned in front of the marker you have planned to do the programming at.
- Tap the green square and give the program a name. Confirm with “ENTER”.
<font inherit/inherit;;#ffffff;;inherit>.</font>- When confirming with “ENTER”, the robot will run forward and search for the marker.- Make sure that you are placed in front of the marker before you confirm the program name.
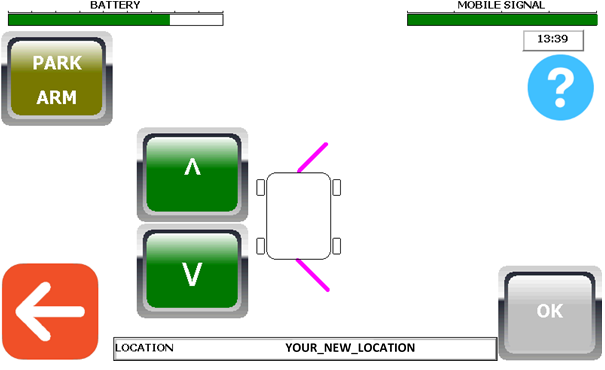
10. Start position
Choose the desired position where the robot will start the program, so called start position.
By choosing a start position the robot knows how far to go from the marker. When the first program have finished, the robot will go from the position it had where the just finished program ended directly to the next programs start position. In other words, the robot doesn't have to go back to the marker for every program which means we save some movements driving back and forth.
Have in mind, when you are choosing a start position, take a position where you can rotate the tower without hitting any pipes or similar.
You must also park all the functions at this step.
- You park the functions by pressing the “Parking”-button in the top left corner. Wait until the current function is parked. Then press the button again until all functions are parked.
i. All functions are parked when the “Parking”-button disappears.
<font inherit/inherit;;#ffffff;;inherit>.</font> - You can now select the desired starting position. Press and hold the arrow “forward” to run the robot forward, arrow “backward” runs the robot backward. In this phase you can run the robot back and forth as much as you want. The robot will only register the last selected position.
- When you are satisfied with the positioning, press “OK”.
The green “OK” -button is only visible when all functions are parked.

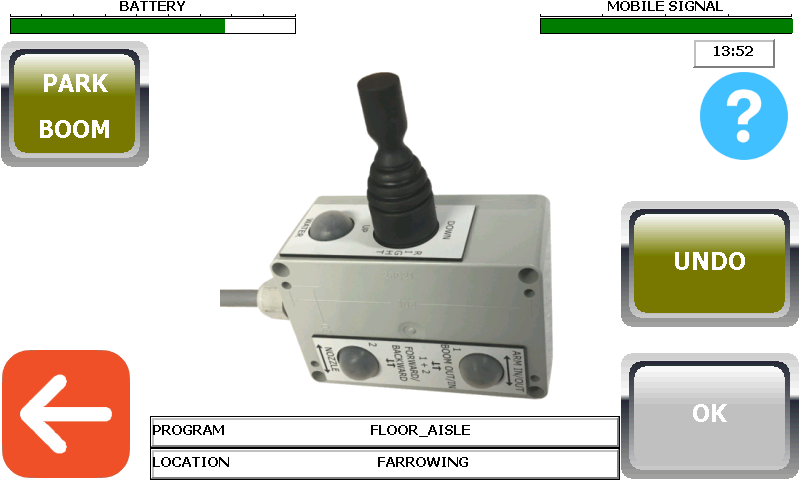
11. Programming with joystick
If you haven't already had the joystick plugged in, plug it in now (under the hood on the right side of the tower).
Remember to start with simple programs. Do not overdo the programs. The more you program with the joystick, the better you will become. Have a plan on where you will start and finish the program. Think through how you on the most efficient way can work your way to where you want to finish.
For more information on how to move the robot with the joystick, go to Programming support and read the chapter Programming - How to move the robot.
- The robot records every movement you do with the joystick once you see the joystick on the screen. You can always undo movements with the “UNDO” button on the screen or undo with the joystick by holding SHIFT 1 + SHIFT 2 then press WATER-button while holding SHIFT 1 and 2.
<font inherit/inherit;;#ffffff;;inherit>.</font>
<font inherit/inherit;;#ffffff;;inherit>.</font>- Keep in mind that you have the time to pause and think through every movement. There won't be any pauses when the robot runs your program automatically.
<font inherit/inherit;;#ffffff;;inherit>.</font> - Turn the water off via the joystick once you are satisfied with your program.
<font inherit/inherit;;#ffffff;;inherit>..</font> - Once you have made all your movements and the water is switched off you must park (bring all functions back to start/parked position) all the functions by using the “PARKING”-button.
<font inherit/inherit;;#ffffff;;inherit>.</font> - It's important that you think through and ensure before you press the “Parking” -buttons so the function you are going to park doesn't get stuck in anything on the way back to its parking position.
<font inherit/inherit;;#ffffff;;inherit>.</font> - The first function to be parked is the arm so adjust other functions (boom/telescope/tower) so that the arm can be parked without getting stuck (you can still run the joystick in between the parking sessions). Apply the same principles when you park other functions but be careful when parking the tower. You might have to move the robot backwards or forwards so the tower doesn't get stuck on pipes.
<font inherit/inherit;;#ffffff;;inherit>.</font> - When all functions are parked (“Parking”-button not visible), confirm with ”OK”.
Once this program is ended you can repeat step 8-11 until you have all programs needed for your recipe. When you have all programs, you can go to next step and create a recipe for these programs.

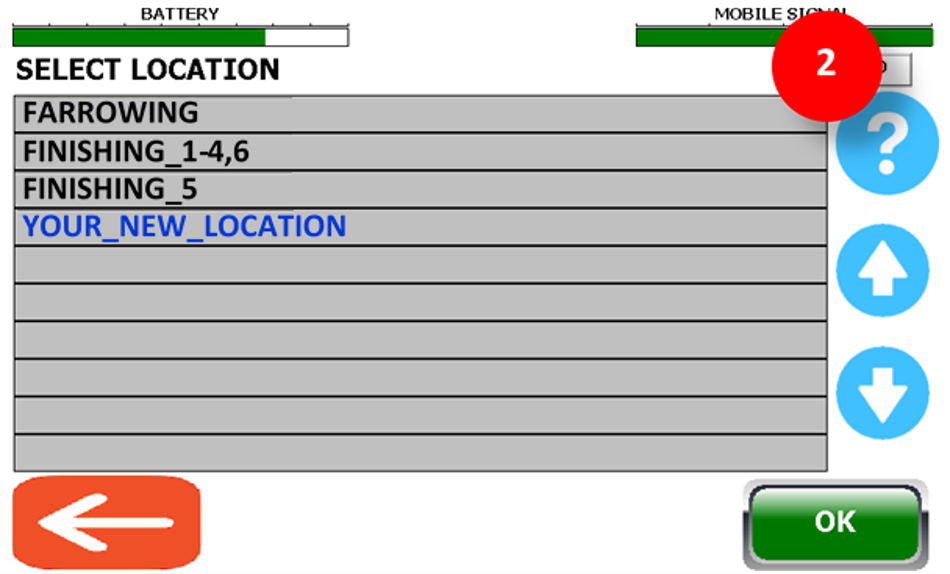
12. Create recipe
Now that you've created one or more programs, you must add it/them to a recipe. Either in a new recipe or in an existing recipe.
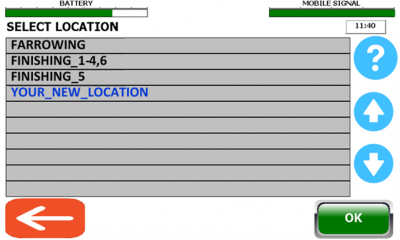
Go to Settings screen and then press ”RECIPE” (picture 1). Select the current location for which you created the programs for and for which you now want to create a recipe for (picture 2). Confirm the location with “OK“.
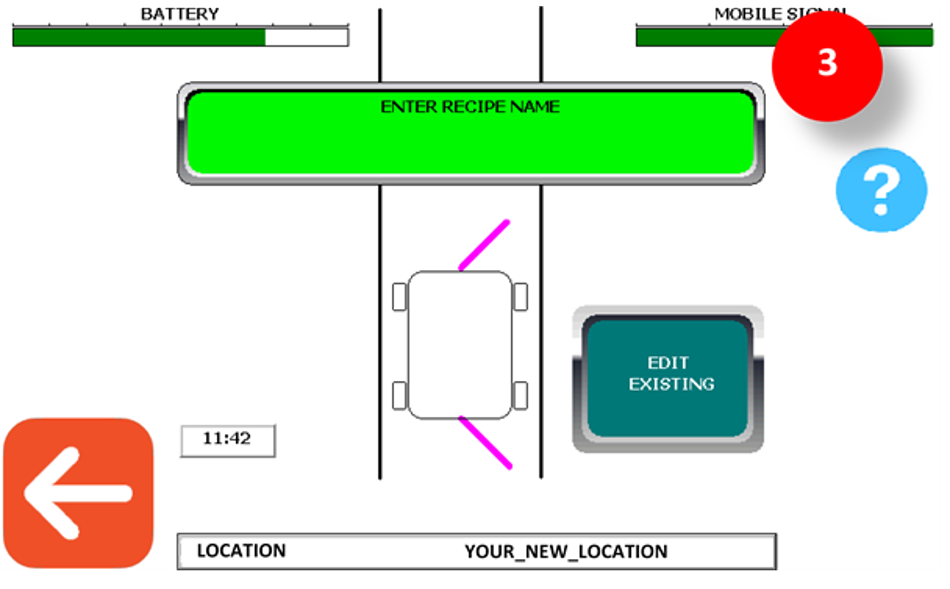
<font 16px/inherit;;inherit;;inherit>Picture 3: You can now choose whether you want to create a new recipe (step 1.) or edit an existing recipe (step 2.).</font>
- Press the green square to create a new recipe.
- Then give the recipe a name.
- Name examples: If you for example just have created the programs “floor right” and “floor left” and want to create a recipe for these. Give the recipe the name 'floor' (contains only floor programs). It's the same thing for the wall programs. Give the recipe the name 'walls' (contains only wall programs).
<font inherit/inherit;;#ffffff;;inherit>.</font>
- To change an existing recipe. Press the “EDIT EXISTING”-button.
- This means that you can add new programs or do general edits to an old recipe without making a new recipe every time.
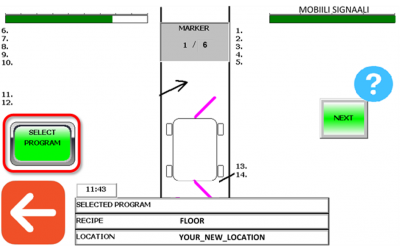
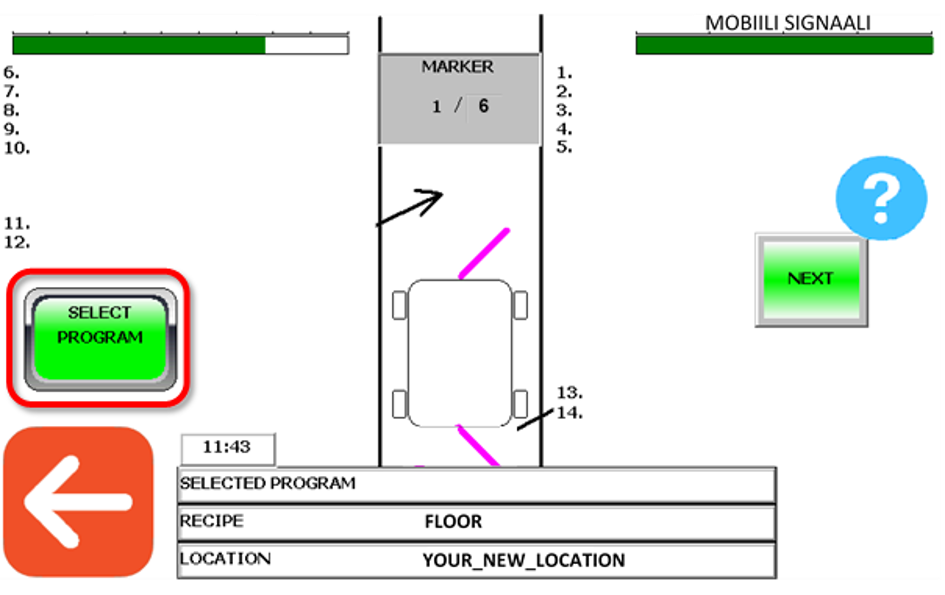
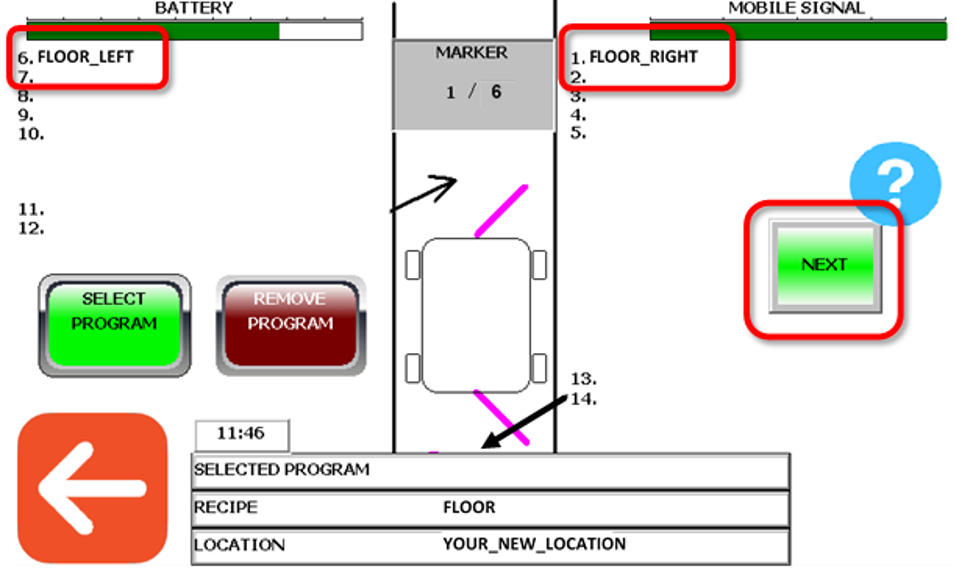
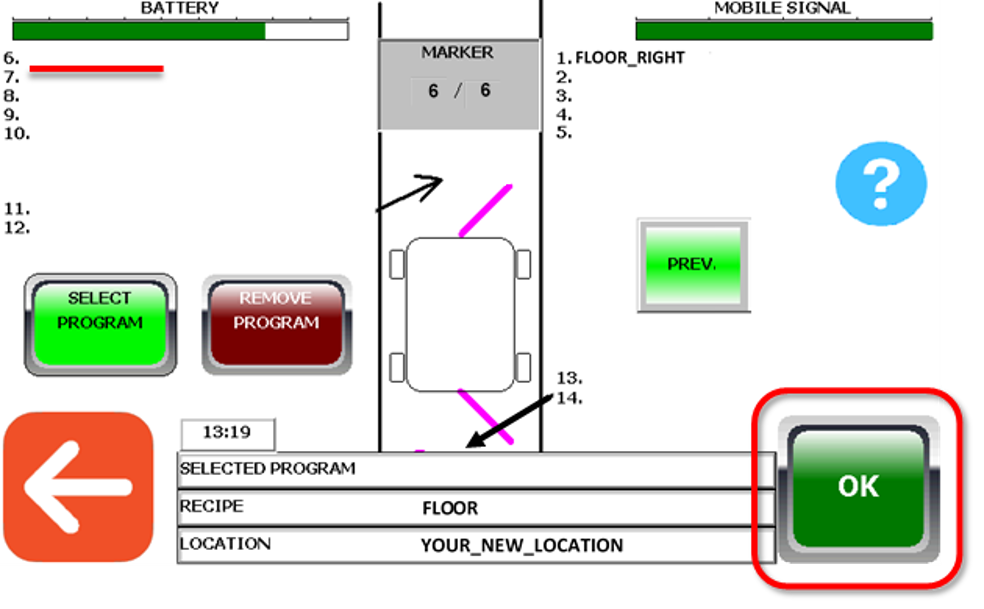
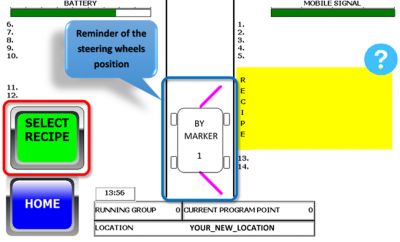
13. Select programs for the recipe
This is where you tell for the robot what it shall do at each marker. In the middle of the screen you can see a gray square. This gray square tells you which marker you are at. The examples show that this location has 6 markers. These examples tell you how to create a new recipe. You use the same principles if you want to edit an existing recipe.
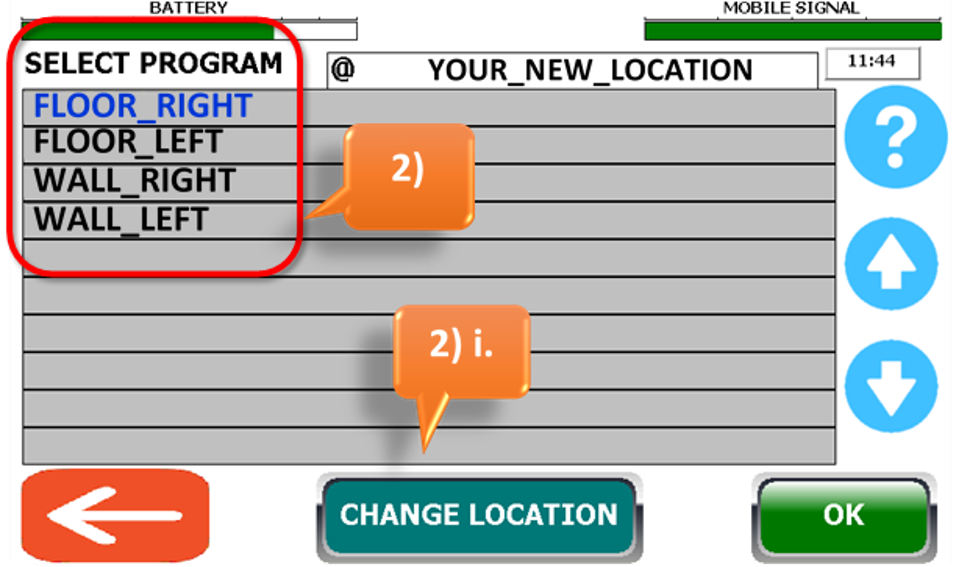
- Press ”SELECT PROGRAM”.
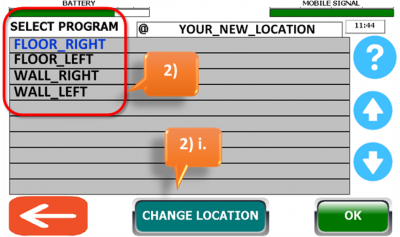
<font inherit/inherit;;#ffffff;;inherit>.</font> - Select the program you want to place at this marker.
- Press “OK” to confirm the selected program.
i. You can also copy programs from another location that would fit to your new location (if pens are identical and markers placed at the same positions in both rooms). You can copy programs if you choose “CHANGE LOCATION” at the bottom of the screen.
ii. Select the location you wish to copy program from.
iii. Select a program you wish to copy.
iiii. Repeat these steps (2.i., 2.ii and 2.iii.) to copy more programs.
 <font inherit/inherit;;#ffffff;;inherit>.</font>
- Once you've chosen your program, place it on the position you want it to wash in.
i. Have in mind that the robot will wash in numerical order. This means that you have to place the program you want the robot to start with (at the current marker) on the right side at position 1 and so on.
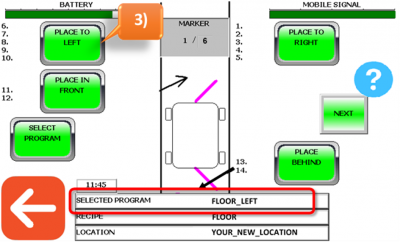
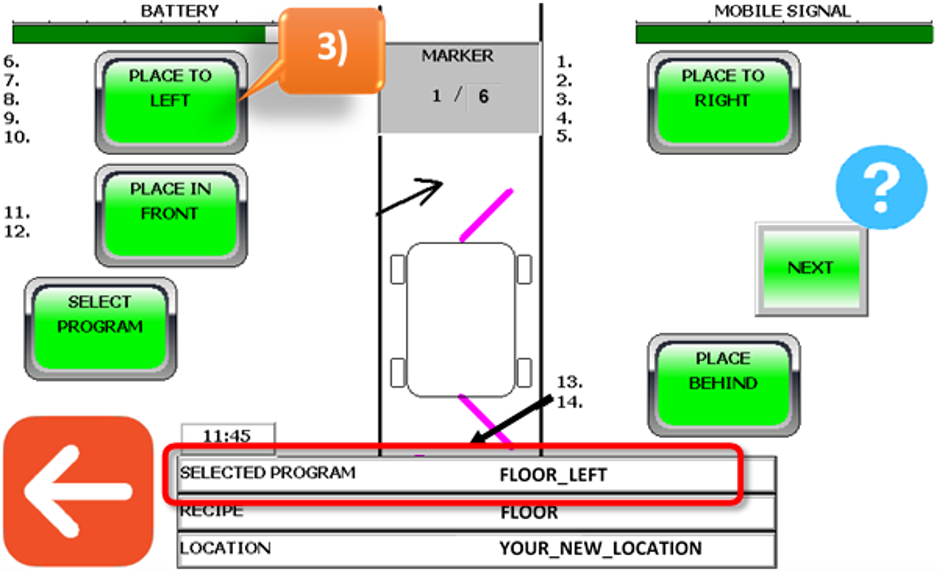
4. You can add several different programs to the same marker. If you want to add more programs to this marker, repeat step 1-3.
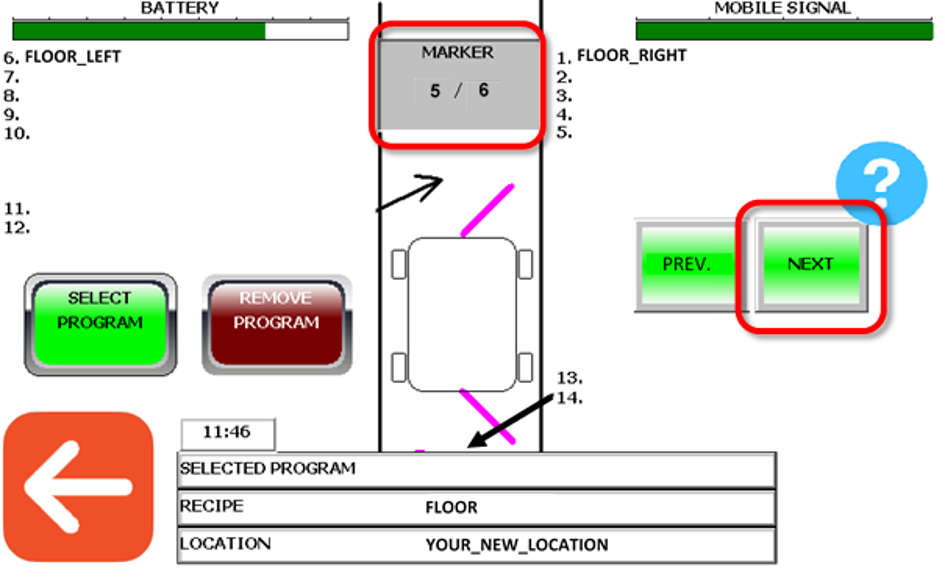
14. Add or remove programs at each marker
In the examples below we can see that “Floor Right” and “Floor Left” are placed at marker 1 to 5 at the first two pictures. At marker 6 (step 3.), “Floor Left” is removed. See the following steps below.
1. Now that you have chosen which programs to use at marker 1 according to the previous step (step 13). Press the green button “NEXT” to proceed to marker 2.
2. The programs you selected at the previous marker follows in the same order to the next marker. Press next to proceed to the next marker if you want to use same programs as the previous marker.
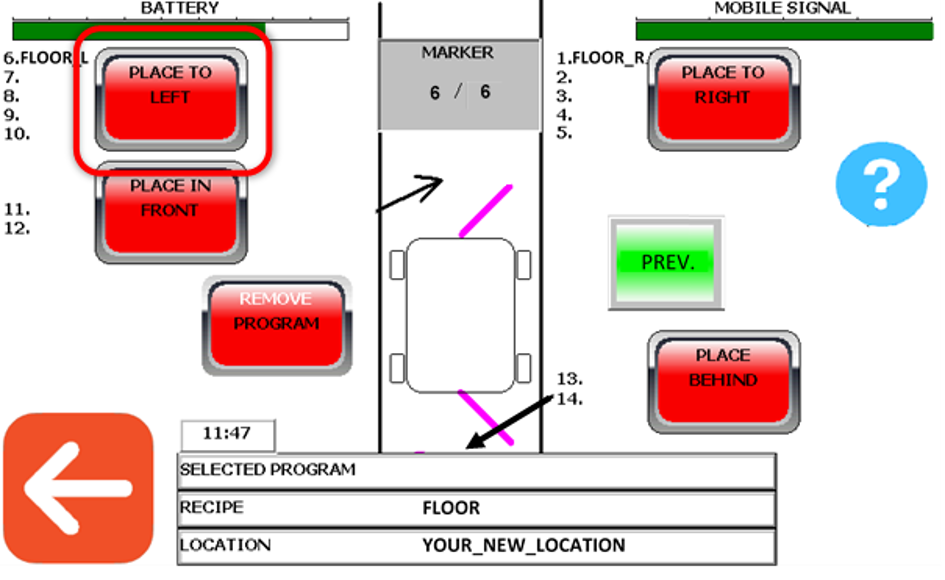
3. If there is something you want to change at any marker, you can add additional programs according to the previous step (step 13. Select programs for the recipe) or you can remove programs that followed from the previous marker by pressing “REMOVE PROGRAM” and then select which side you want to remove programs from.
As you can see in the pictures below, we remove FLOOR_LEFT from position 6.
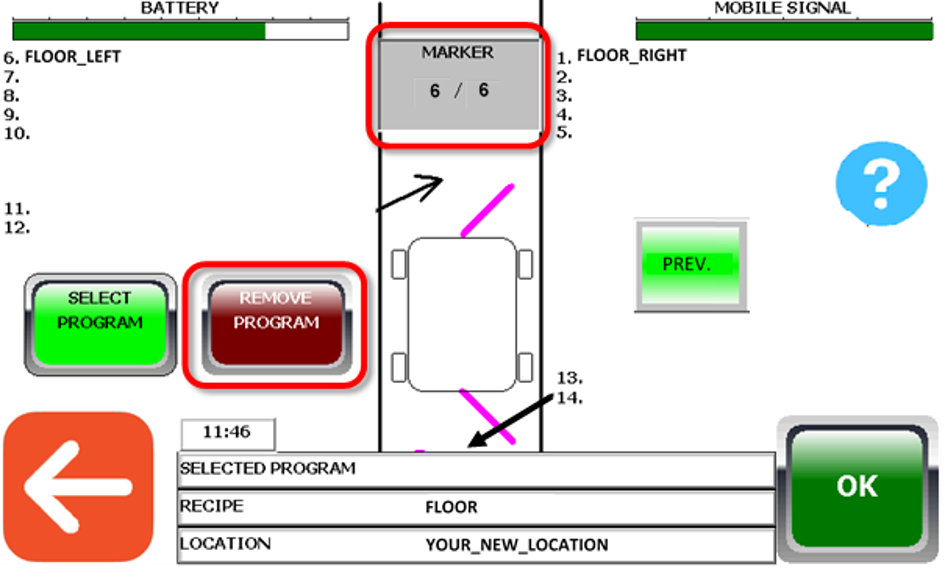
4. Confirm and save the recipe with “OK” when you have gone through all the markers. You can only save the recipe once you are at the last marker.
You have now created your recipe. Repeat this procedure with the other recipes you need for this location. You should now create a wall recipe if you recently created a floor recipe. (if you already have wall programs. If not, go to Step: 8. Create a program to program the wall programs.)
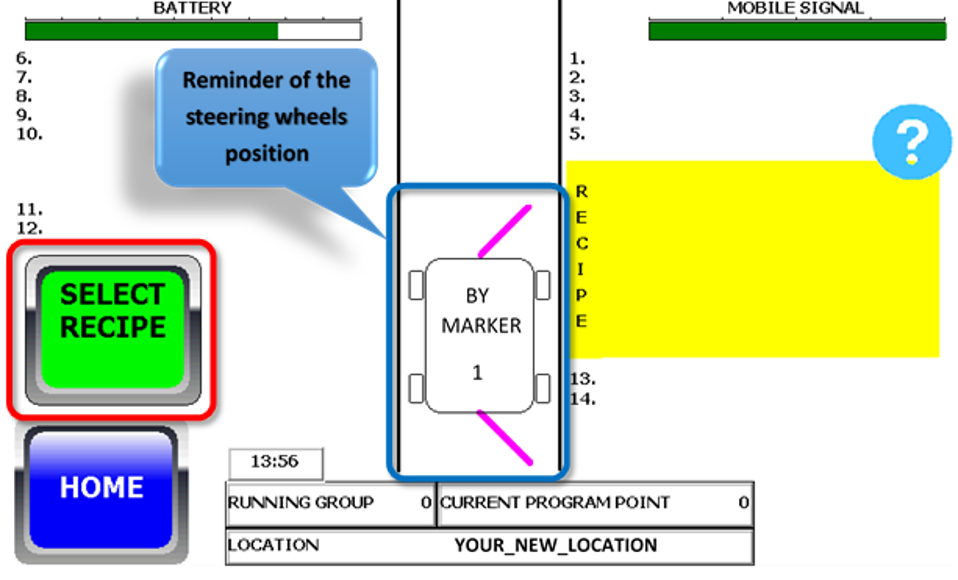
15. Start an automatic wash
If you have all your programs placed in their recipes (floor programs in a floor recipe, wall programs in a wall recipe), you can start washing. Start by making sure that the robot's marker sensor is positioned about 30 cm behind the first marker (or behind that marker you want to start washing from) and adjusted so the sensor is maximum 10 cm away sideways from the marker. The robot can only start washing from physical markers. The overview of the robot is a reminder for which side to set the support wheels to.
- On the start screen, press “START”.
- Select the location you want to wash. Accept with<font inherit/inherit;;#ffffff;;inherit>..</font>in the bottom right corner.
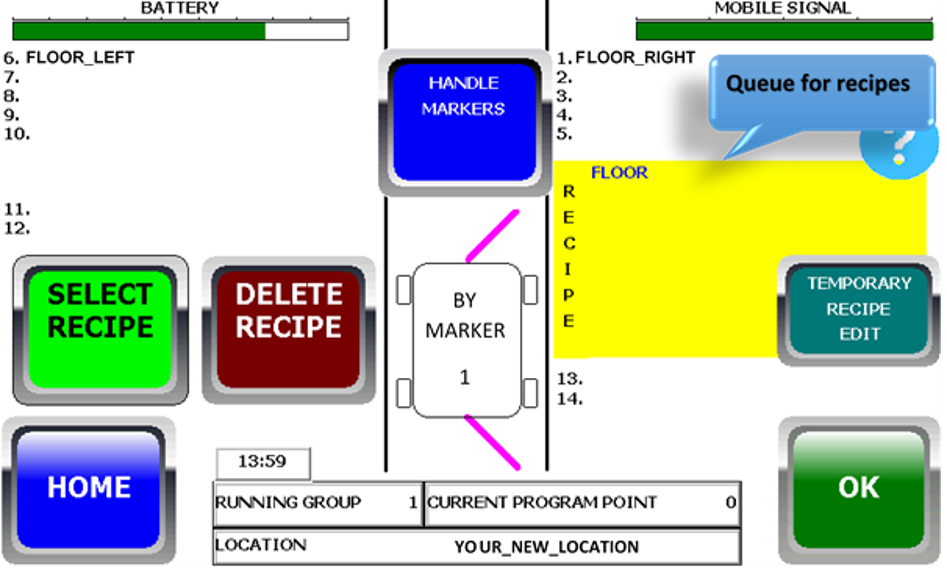
- Press “SELECT RECIPE”.

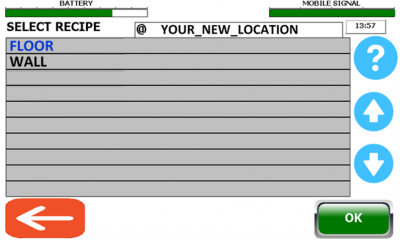
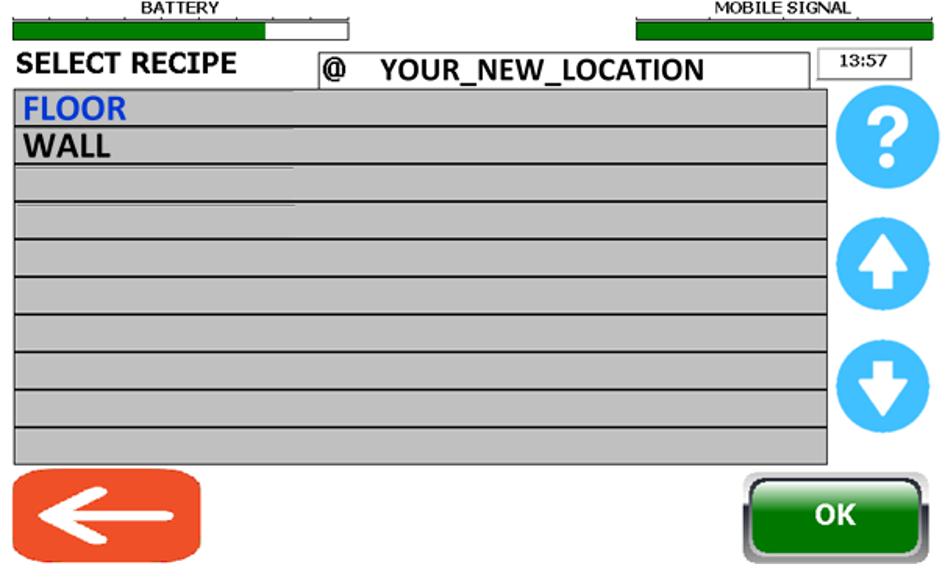
16. Start an automatic wash - Select recipes
- Choose the recipe you want your wash to start with.
- When you select a recipe, the recipe are added to a list. This list is yellow and shows the washing schedule/recipe queue.
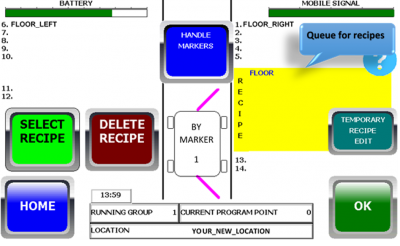
- You can run the same recipe repeatedly. If you want to add more recipes to the queue, repeat the process you just did by pressing “SELECT RECIPE” again. Press “DELETE RECIPE” if you want to remove recipes from the queue.
For example, you can select the recipes in this order: Floor, Floor and last Wall if you think the floors needs extra attention. See the example below.
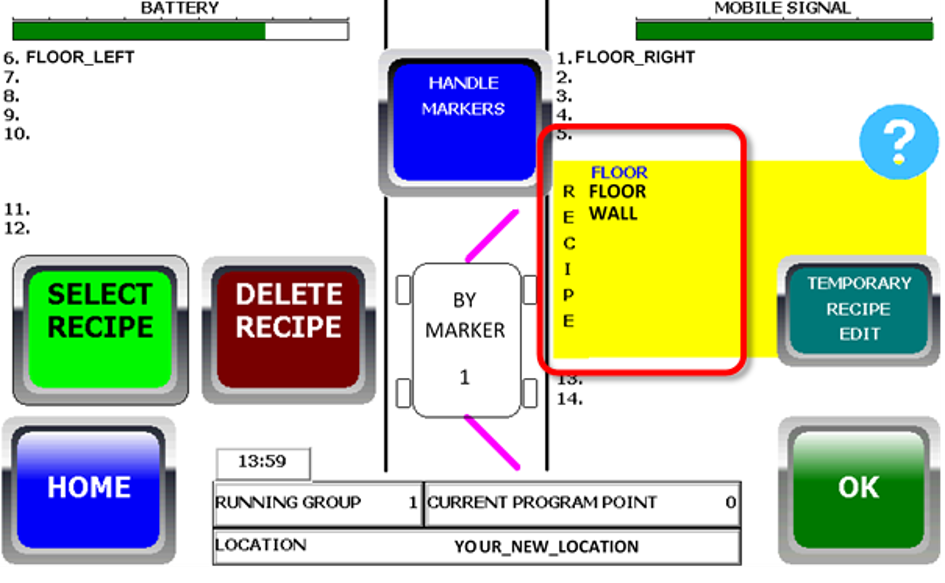
Make sure that the robot is positioned with the marker sensor in front of the first marker (up to 100 cm in front) before you press “OK”. When you press the “OK”-button the robot will run forward to find the marker and start the automatic wash based on the recipe queue you have selected.
17. Automatic wash
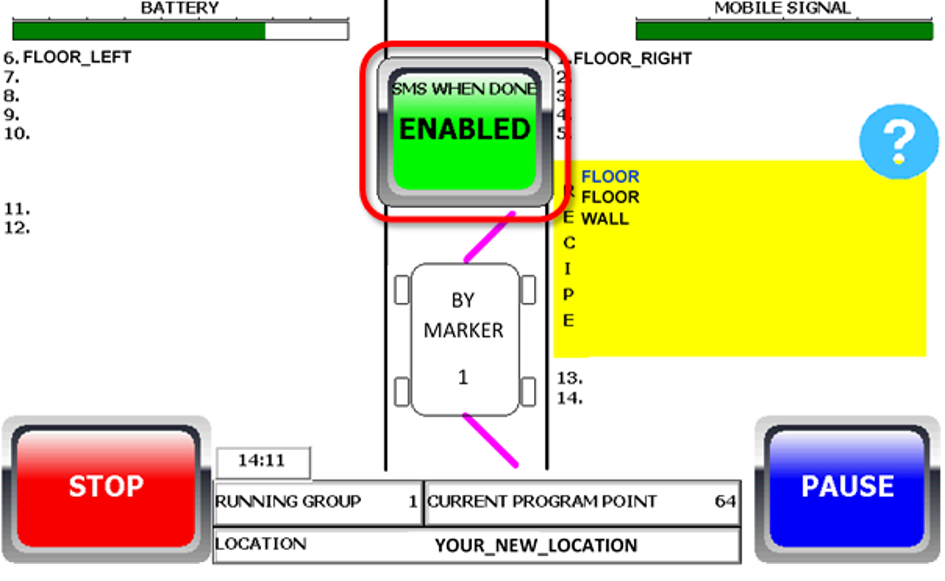
The robot do now wash automatically according to the information you have given it.
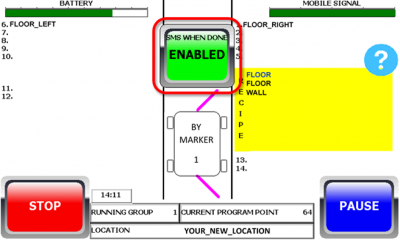
- In the middle of the screen you can ENABLE so you will receive a text message when the wash is finished (press “SMS WHEN FINISHED” to enable/disable this function). But for that to work you must have entered your mobile number via the internet screen (step 2. Settings).
 <font 11px/inherit;;inherit;;inherit>Run mode.</font>
 - If you press “STOP” during an active wash, the robot will finish the program it has started and stop when the program has ended.
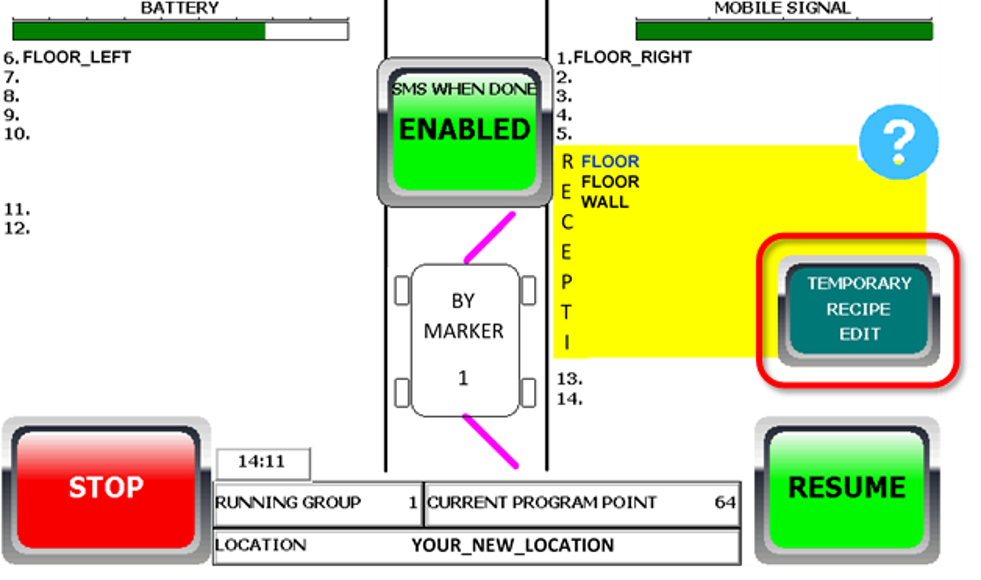
- You can pause the wash with “PAUSE”. In paused mode, you can also make temporary changes to the current recipe.
 <font 11px/inherit;;inherit;;inherit>Paused mode.</font>
 - To cancel the wash immediately, press “PAUSE” and then “STOP”.
- Use the emergency stop (the big red button on the robot, under the screen) to stop the robot in unexpected situations.