
Joystick - Hur man rör roboten
Du behöver joysticken för att kunna programmera EVO Cleaner. Här kan du läsa om hur joysticken fungerar och hur roboten rör sig.
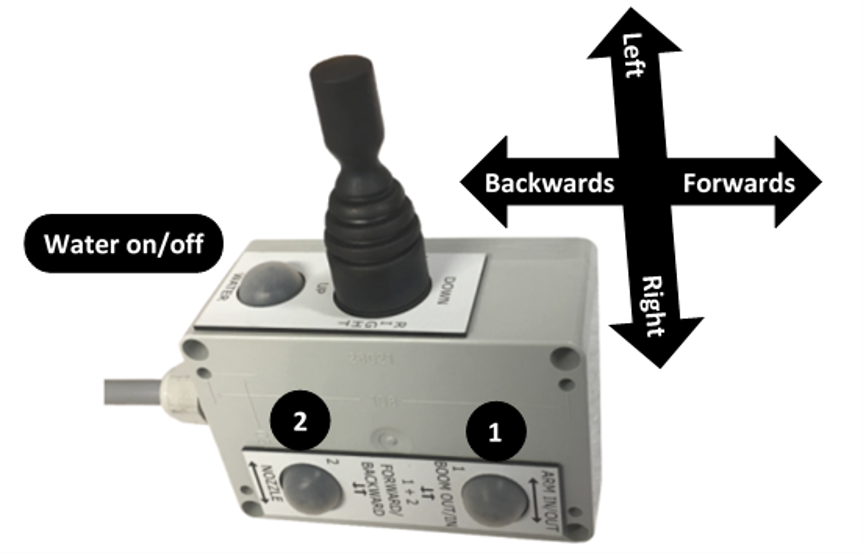
Joysticken är ansluten till det svarta uttaget, som finns under huven på städrobotens bakre högra sida. Kontakten måste vridas 90 grader för att den ska sitta fast ordentligt när den är ansluten.
Joysticken har en axel som kan röras i fyra riktningar.
Knappen på toppen (närmast axeln) öppnar och stänger vattenventilen.
De två knapparna på sidan (1 och 2) aktiverade olika funktioner när de hålls nere (se längre ner).
Joysticken kan bara användas under inlärningsprocessen (inspelning) och när den manuella skärmen visar. Annars är joysticken blockerad för användning. Vi rekommenderar att öva med joysticken på den manuella skärmen för att bli mer bekväm med rörelserna.
Länk: Sprängskiss av joysticken.
EVO Cleaner-rörelser
Allmän information
Vissa rörelser är mer krävande för roboten än andra. Att en rörelse är krävande innebär större belastning på elmotorn men också större strömförbrukning, vilket leder till högre batteriförbrukning.
 Rörelser vi vill undvika - Gör inte detta:
- Långa rörelser med bommen upp och ner när teleskopet är långt ut. Ju längre ut teleskopet är, desto tyngre blir det för bommotorn.
- Teleskopet utåt när bommen är i uppåtgående läge.
- Vrid inte tornet åt sidan när vattnet/munstycket är vänt åt sidan. Om vattnet rör sig åt sidan när tornet roterar, kommer vattentrycket att påverka elmotorn. Ju längre ut teleskopet/armen är, desto högre blir effekten.
- Munstycket ska alltid peka nedåt under förflyttning av roboten. Detta för att det starka vattentrycket påverkar robotens navigation.
Därför är det viktigt att du använder våra principer som grunder under programmering för att få ut robotens fulla potential utan onödiga rörelser och med minsta möjliga slitage på roboten.
I grund och botten använder vi många rörelser med tornet, armen och munstycket för att skapa cirkulära mönster i våra program (mest effektivt). Bom, teleskop och hjul används mest för att ta en ny position (kortare rörelser).
Under inlärning har alltid stora marginaler för att undvika kollisioner.
Rörelseriktningarna i följande illustrationer beskrivs sedda bakifrån roboten.
Bom upp/ner
Bommen rör sig cirka 100° från botten (position 0) till toppen (position 1250). Parkeringsläget ska vara horisontellt (cirka position 700).
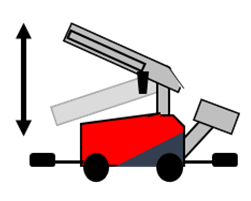
Flytta joystickaxeln bakåt/framåt.
Sliten högre/vänster
Tornet kan röra sig cirka 200° i båda riktningarna (positioner ±1000) från sitt parkerade främre läge (ungefär position 0).

Flytta joystickaxeln åt höger/vänster.
Robot framåt/bakåt
Denna funktion räknar avståndet (pulser) från markörerna för att få dess positioner.

Flytta joystickaxeln framåt/bakåt medan du trycker på knapp 1 och 2 samtidigt.
Teleskop ut/in
Teleskopet kan köras från sitt parkerade läge 0 till position 425.

Flytta joystickaxeln framåt/bakåt medan du trycker på knapp 1
Arm ut/in
Armen startar från sitt parkerade läge parallellt med bommen (läge cirka -55). Armen kan gå ut cirka 315° (till läge 1100), så den pekar mot taket.

Flytta joystickaxeln åt höger/vänster medan du trycker på knapp 1.
Munstycke höger/vänster
Munstycket kan rotera 360° i båda riktningarna. Munstycket är parkerat när armen är parkerat och munstycket pekar nedåt.

Flytta joystickaxeln åt höger/vänster medan du trycker på knapp 2.