
Table of Contents
Basics – Explanation of different concepts
Background
This is a guide explaining the steps you need to know when programming location/programs/recipes to better understand our EVO Cleaner. This instruction is followed up by a Screen guide - Step by step. It shows you exactly how to press on the display.
General
For each unique room, the robot needs a new location, which is suggested to be named same as your room name. If you have rooms that are identical, you can include all rooms to the same name. A new location means that the robot needs to read and sense where the markers are placed. Example of name for locations: “Finishing 1”. Is “Finishing 1” identical to five other rooms, we can for example, name the location “Finishing 1 – 6” or “Finishing 1 – 4,6” If “Finishing 5” is different from the other rooms. By different we mean for example that one room can be shorter/longer or have other factors that makes it impossible to repeat the same programs.
For each location we create unique programs, adapted for this location. This means that a program in another location can have the same name without having duplicates(see illustration below). For the programs to work and wash in the right order, we must add them in recipes. Everything that is created for a location will only be available in this room (see the illustration below).
However, it is possible to copy programs from one location to another if you know that this program would fit in identical pens in another room (identical pens with same position of the magnetic markers). This feature is found where you create recipes. For more information, read from step 12. Create recipe to step 14 in the screen guide.
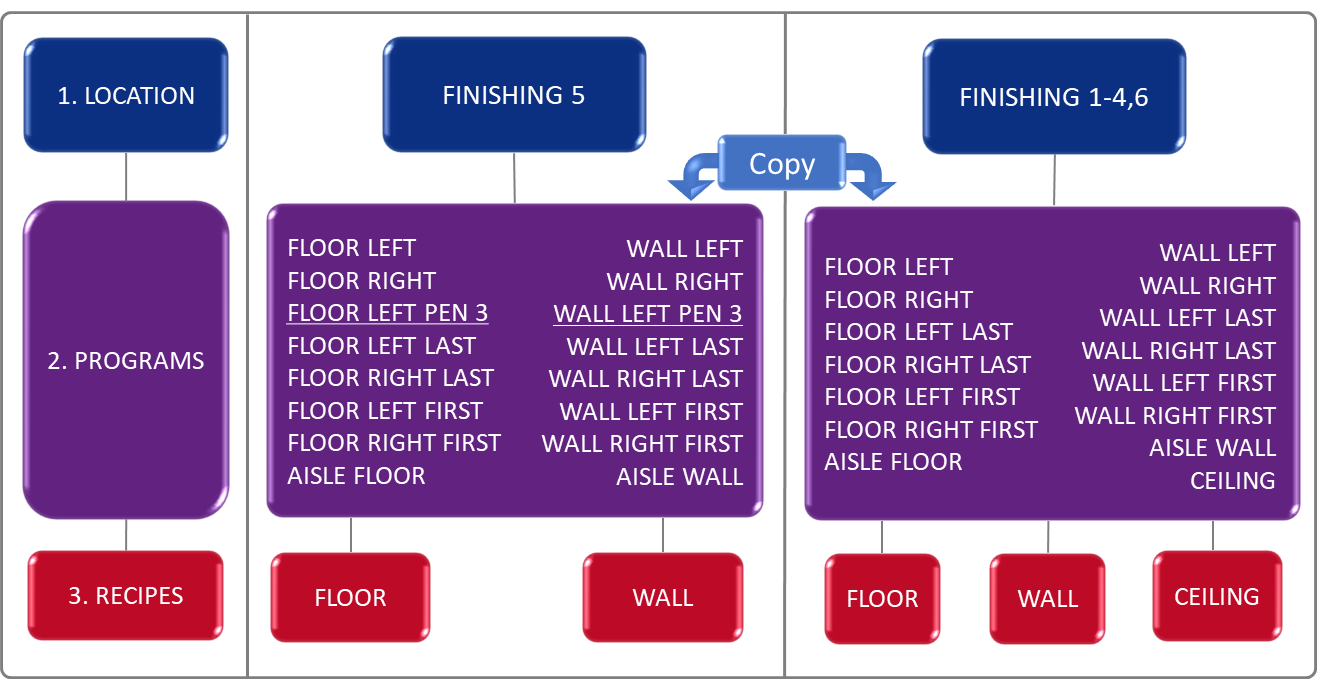
Examples on what a structure could look like, location by location. In this example, the location “Finishing 5” has a special program for pen 3 on the left side where a pillar to the ceiling was badly placed in this pen. “Finishing 5” is also mirrored against “Finishing 1 – 4.6”, which means, a new location and new programs were needed for this room.The programs you make in one location belong to this location only. It is possible to copy programs from one location to another when creating recipes.
Parking
The movable functions on the robot have so-called parking positions. The robot starts from these positions when you create a new program. The robot registers the current parking positions when programming and uses these as references for the automatic wash. Therefore, it’s very important that your robot always has the same physical parking positions.
If your robots physical parking positions change and you start a program with other parked positions (other than the robot had under the teach-in), this program would wash incorrect and there is a risk that the robot get an alarm due to incorrectly movements (alarms=ineffective robot) or you could have a poor result of the wash.
Parking positions are pre-programmed at Envirologic and should only be changed by trained service personnel. Contact Envirologic if necessary.
How EVO Cleaner stands when parked:
Boom: Parked when it is horizontal.
Tower: Boom pointing straight ahead in the robot's direction.
Telescope: Fully retracted.
Arm: Parallel with the boom.
Nozzle: Rotor nozzle pointing downwards towards the robot when arm is parallel with the boom.
Keep these positions in mind when the automatic wash starts, and the robot makes its first automatic parking after it has sensed the first marker. Does the robot set as above? The robot also parks after a program is finished.
Program
Program is what you teach the robot with the joystick. It is very important that you start with programs that are simple and that work without alarms. Nobody will master the programming perfectly the first few times. Practice makes perfect. If you try too much and do too difficult things, there is a risk that the robot will go into alarms and your EVO Cleaner will be inefficient. An EVO Cleaner that washes 70% clean, efficient, is a better robot than the one who tries to wash up against 100% but who always ends up in alarm. The more you program the better programmer you will be, and it'll give you better results and more efficient programs. First aim to create programs that work efficient. Do only focus on the "standard" pens (the pens in the middle) when you start. The first and last pens are most often unique and needs individual programs. When this room is empty next time, you can add new programs, like the first or last pens. You can also reprogram a program that needs to be improved. This time you will make even better programs that are even more efficient and provides better results. Work gradually with this until you get programs with a result you are happy with.
So bottom line, don't try too much the first thing you do.
Do your programs according to the following priority list:
- No alarms
- Efficiency
- Results
You might wonder, why not results as priority one?
If this list is flipped upside down, there is a risk that the robot is in alarm because you are over ambitious with too small margins. That will give you an inefficient robot, which you do not want.
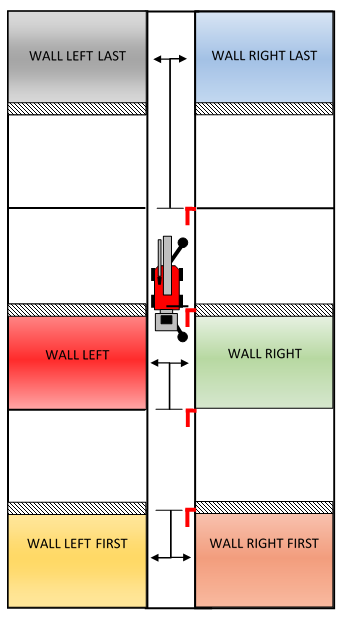
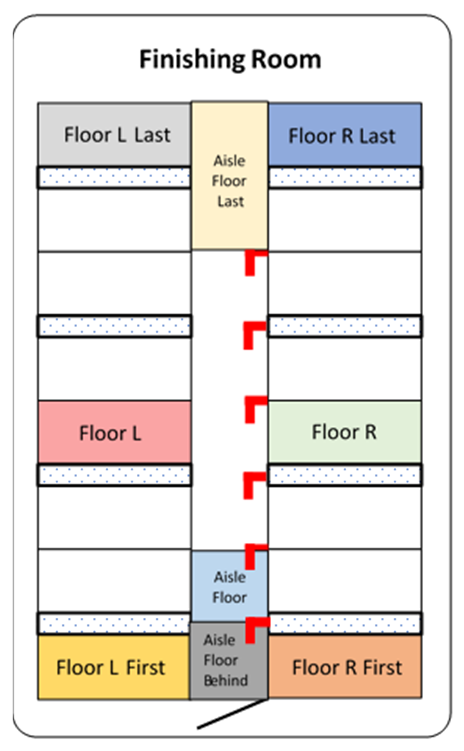
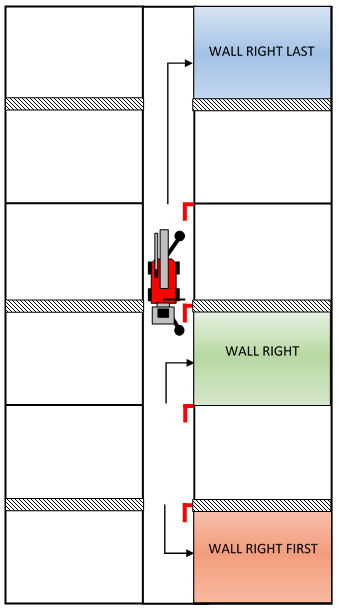
The programs are named to the specific washing area. General standard names are “Floor Right, Floor Left, Wall Right, Wall Left, Ceiling, Aisle, Floor R First, Floor L First, Floor R Last, Floor L last” etc. It is important to keep the names short (L=left, R=right). You need to make individual floor programs for the right and left sides. Same with the wall programs.
Pens in the same row that are identical can be washed with same programs. Check if there are pens that is different from others. Such as size, interior, location of pipes and other circumstances.
Generally, you want to use the same program for all pens in that row. For example, use “Floor R” and “Wall R” to the entire right-hand side. Check if it’s possible to apply the same program to mirror-flipped pens if a row has that.<font 11.0pt/inherit;;inherit;;inherit>If two different programs are needed for mirror-flipped pens, they could be named “Floor R 1”/“Wall R 1” and “Floor R 2”/“Wall R 2”.</font>
The first/Last pens are often different with size and is adjacent to external walls so there isn’t possible to apply the same program in these pens. These pens need individual programs. For example, the floor program for the first pen on the right side is named “Floor R First”.
Washing the aisle is done in the same way. A program to your floor recipe that only focuses on the floor in the aisle and another program to your wall recipe that washes the walls in the aisle.
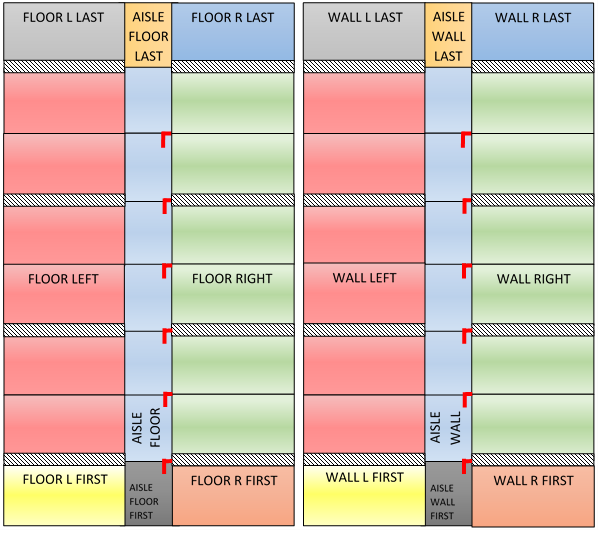
Examples: Maps of needed floor and wall programs to clean the entire room. As you can see, you get most out of the programming if you focus on the pens in the middle. These pens can repeat the same program.
All the programs you teach the robot, must be placed in a recipe <font 11.0pt/inherit;;inherit;;inherit>in order to work.</font>
Recipe
The recipes tell the robot what programs it should run at each markers. A compilation/summary of different programs. The recipes should be divided so the floor and wall programs are in separate recipes. This is generally for pig stables.<font 11.0pt/inherit;;inherit;;inherit>This means that the robot will first wash the floor in all pens. Then the robot runs back and wash the walls in each pen. We do like this because the floors are the dirtiest area and needs the most focus. This means that the water will have time to soak and loosen the dried-in layer on the floor that has not been released properly. The wall program ends with a rinsing of the floor that takes the last dirt.</font>
<font 11.0pt/inherit;;inherit;;inherit>It is the recipes that you are selecting before automatic start. Select the recipes in the order you want them to wash.</font>
<font 11.0pt/inherit;;inherit;;inherit>If you know, before the start of the wash, that the floor is very dirty and it sits hard you can run the floor recipe for example 3 times in a row to get more focus on the floor and then finish with the wall recipe.</font>
<font 11.0pt/inherit;;inherit;;inherit>Name the recipes for the General washing task. Such as “Floor”, “Wall”.</font>
Markers
Magnetic markers are the robot's references. They make the robot place itself correctly in the aisle. Markers shall be placed in the same place at each pen (see illustrations below). Preferably we want the markers to be placed between the pens, somewhere close to the wall which divides the pens. Imagine that the two pens (right side pen and left side pen) after the marker is connected to the marker (see illustrations below). If you have identical rooms, place the markers in the same position in every room to ensure that the robot is positioned correctly and avoids collisions. The markers main tasks is to repeat the programs you have made with the joystick and to position the robot correctly in the corridor.
OBS: Do not mount markers so they get inte contact with metal. This may spread the magentism and disorient the robot. This is most relevant for Short S-markers.
Examples of marker placements in a weaning, finishing or similar room:
As seen in the two illustrations below. One room doesn't have a marker at the last pen but the other does. If your room has gates (or something else) in the aisle that are sticking out a couple centimeters from the wall, which leads up as an obstacle for the robots guidance wheels, then you should use a marker at the last pen. If there are obstacles in the aisle the robot could position itself incorrect due to slipping/spun drive wheels (too big obstacle for the guidance wheels to climb over).
The markers are there as a reference, making it possible for the robot to reposition itself if something goes wrong in the positioning in the aisle. If the aisles wall, which the robots guidance wheels are facing, are even and smooth it is not necessary to use a marker at the last pen. Since the last pen needs a special program due to the outer wall/door that are in the way for the guidance wheel at the front. Those programs could nevertheless be thought from the marker before.
In the examples below, we can use the programs in the middle to all the pens in the middle. The markers makes it possible to repeat these by putting the programs in to a recipe.

Example of marker placements in farrowing:
A farrowing room has most often mirror flipped pens. This means that the robot needs to do a program for each unique pen and then repeat the same programs at next marker. This means the robot only needs a marker at every second wall. The robot will in this case repeat four programs at the markers in the middle.
Markers are magnetic and the robot has a magnetic sensor to read the markers. The magnetic markers are only placed in the aisle during the automatic wash. Brackets are mounted permanently. The magnetic sensor must be within 10 cm from the markers, otherwise the sensor cannot read the markers.
Virtual markers give you the ability to use fewer markers in those rooms where you have a very long aisle with many identical pens. This means that physical markers are placed at every other pen.
Read more about virtual markers here. <font 11.0pt/inherit;;inherit;;inherit>You can only start a wash and teach programs to the robot from a physical marker.</font>
Do not use the virtual marker feature if the pens are 280 cm and above wide. The robot can only reposition itself when it reads a physical marker. If the distance between the physical markers are too far there is a greater risk for incorrect positioning.
With virtual markers you don't need as many physical markers, a good feature for those rooms that are very long.
Link: Different types of magnetic markers
Examples
How learning of programs should be made:
Recipe name: Floor
Learning of programs can only take place from physical markers (important for those who intend to use virtual markers).
Learning the programs for the first pens are done from marker 1. For learning programs to the first pens, drive the robot backwards with the green arrows when selecting the start position. <font 11.0pt/inherit;;inherit;;inherit>Programming for the last pens are</font> <font 11.0pt/inherit;;inherit;;inherit>done from the last physical marker. Start learning from the last physical marker, but drive the robot to the desired starting position(past the second to last pen according to these examples). This means that we do not need another marker at the last pen (optional) at the end because no matter, you would need individual programs for the first and last pens due to the outer walls (</font> guidance <font 11.0pt/inherit;;inherit;;inherit>wheels could hit the wall/door at the start/end of the aisle).</font> <font 11.0pt/inherit;;inherit;;inherit>Different type of rooms could have different types of solutions.</font>

 = Feeder
  = Marker
<font 16px/inherit;;inherit;;#e74c3c>“Floor L”</font> and
<font 16px/inherit;;#000000;;#2ecc71>“Floor R”</font> could, for example, be programmed at marker 3 and then applied to marker 1,2,3,4, 5 and 6 because there are similar boxes there. The boxes are mirror-flipped but only with the feeders on the other side so same program can be applied in these, just have that in mind during the programming so you keep same distance on both sides.
= Marker
<font 16px/inherit;;inherit;;#e74c3c>“Floor L”</font> and
<font 16px/inherit;;#000000;;#2ecc71>“Floor R”</font> could, for example, be programmed at marker 3 and then applied to marker 1,2,3,4, 5 and 6 because there are similar boxes there. The boxes are mirror-flipped but only with the feeders on the other side so same program can be applied in these, just have that in mind during the programming so you keep same distance on both sides.
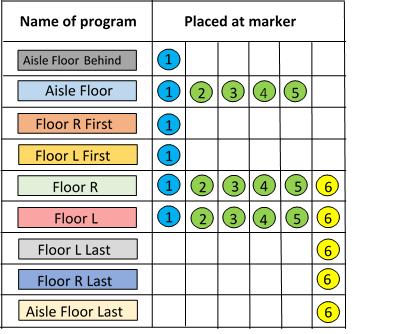 <font 12px/inherit;;inherit;;inherit>The table shows which markers the programs are placed at. Markers with same color contain the same programs. This is an example in a finishing room.</font>
To get all floor washed, in the room in the example of the previous sheet, <font 11.0pt/inherit;;inherit;;inherit>9 different programs were needed.</font> <font 12pt/inherit;;inherit;;inherit>The programs are:</font> <font 11.0pt/inherit;;inherit;;inherit>Individual programs for the first and last boxers on each side (4 programs) because they have all different requirements.</font> <font 11.0pt/inherit;;inherit;;inherit>“Floor R” and “Floor L” are programs that works to the majority of each side (2 programs). One program for the first part of the aisle that washes behind the robot, one program for the aisle that works at the majority of the markers,</font> <font 11.0pt/inherit;;inherit;;inherit>and one program for the aisle at the last marker where there is another distance from the marker to the outer wall (3 programs for the aisle).</font> <font 11.0pt/inherit;;inherit;;inherit>Same principle with wall recipes.</font> <font 11.0pt/inherit;;inherit;;inherit>Floor programs are shorter than the wall programs.</font> <font 11.0pt/inherit;;inherit;;inherit>The time you put to make programs is well invested time when the quality and efficiency increases every time.</font> <font 11.0pt/inherit;;inherit;;inherit>Aim to improve the programs in this room at the next wash and next wash, until you get a result you are satisfied with. This way you keep yourself familiar with the robot and you become a better programmer over time.</font>
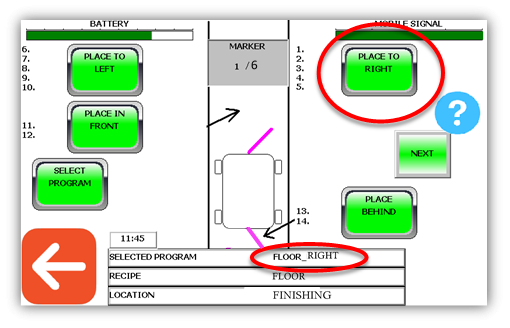 <font 12px/inherit;;inherit;;inherit>Programs created for the right side are placed at the right side (position 1 – 5 as shown on the screen).Programs created for the left side are placed at the left side (positions 6 – 10).</font>
<font 12px/inherit;;inherit;;inherit>“Place in front” (Positions 11 – 12) and “place behind” (positions 13 – 14), can you use for the aisle programs.</font>
<font 12px/inherit;;inherit;;inherit>Placing a program on the right side that is programmed for the left side or vice versa doesn’t matter. This concept is only to visually get a clearer picture of what you want to wash at each marker. The robot washes in numerical order.</font>
<font 12px/inherit;;inherit;;inherit>Programs created for the right side are placed at the right side (position 1 – 5 as shown on the screen).Programs created for the left side are placed at the left side (positions 6 – 10).</font>
<font 12px/inherit;;inherit;;inherit>“Place in front” (Positions 11 – 12) and “place behind” (positions 13 – 14), can you use for the aisle programs.</font>
<font 12px/inherit;;inherit;;inherit>Placing a program on the right side that is programmed for the left side or vice versa doesn’t matter. This concept is only to visually get a clearer picture of what you want to wash at each marker. The robot washes in numerical order.</font>
- - - - - - - - - - - - - - - - - - - - - - - - -
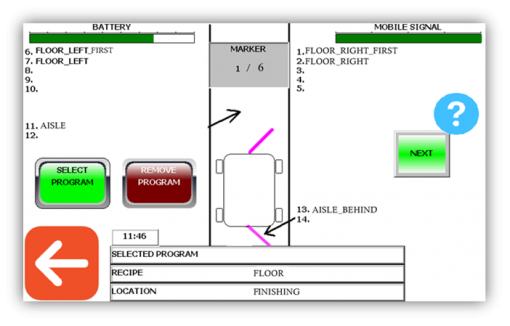
This picture shows how it would look like at marker one with all programs according to the examples at the previous sheet. <font 12px/inherit;;inherit;;inherit>The location is named Finishing. Recipe is named Floor. The location has 6 markers.</font> <font 12px/inherit;;inherit;;inherit>The programs for this location are placed on their positions. Including the aisle programs.The next step is to go to the next marker and choose which programs you want to use there.</font> <font 12px/inherit;;#ffffff;;inherit>.</font> <font 12px/inherit;;inherit;;inherit>Keep in mind that the same programs will follow from the previous marker, to the next marker in the same order. To use other programs when you are at marker 2, you can remove the ones that followed.</font>
If you want to learn more and see exactly how to press on the screen, go to “Screen guide - Step by step”.