
Table of Contents
Floor program
This instruction gives you the basics of the washing patterns we want you to apply in your floor programs. This is partly for the robot to wash as efficiently as possible but also for the wash to be ergonomic to the robot itself.
Before jumping in to the instruction below, you should know about the robots movements (joystick) and parking positions.
If you need more basic information and understanding regarding programming, you can find it here.
If you want guidance on how to press on the screen, you can find it here.
General information
Some motions are more demanding for the robot than others. The fact that a motion is demanding means greater strain on the electric motor but also greater power consumption, which leads to higher battery consumption.
The movements we count as heavy are a lot of boom up- and down. The further out the telescope is, the heavier it gets for the boom motor. Another demanding motion is to run the telescope out when the boom is in an upward position or generally long movements with the telescope.
Do not turn the tower sideways when water/nozzle is sideways. The water pressure that comes out from the nozzle effects the tower motor which could lead to alarm.
Therefore, it is important that you use our principles as basics during programming to get the full potential of the robot with the least possible wear.
 Always have good margins to the interior of the pen with every part of the robot.
The washing patterns
For a floor program, start from the marker and select a start position so that the tower is in the center of the pen (if possible due to pipes). When selecting the start position, have in mind that you must be able to turn the tower into the pen. You might have to select a start position further back so you can turn the tower in to the pen, then running the robot forward, to the centre of the pen. If you have a pipe that is unfortunately placed, you must work with the angles and range of motions that it gives you.
The following illustrations demonstrate when the slat is on the opposite side of the robot. If you have the slat by the robot, start from the other end of the pen so you push the dirt against the slat. The illustrations to come are basic movements for you to apply to any type of pens.
The movements shown in this instruction is general movements but can slightly vary from one pen to another pen.
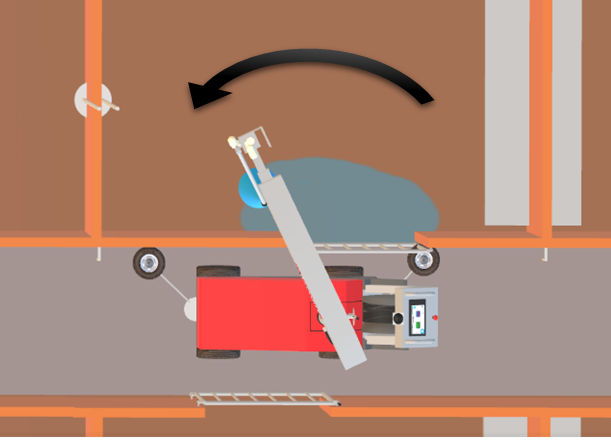
Once you selected your start position and the joystick is shown on your screen, do the following steps:
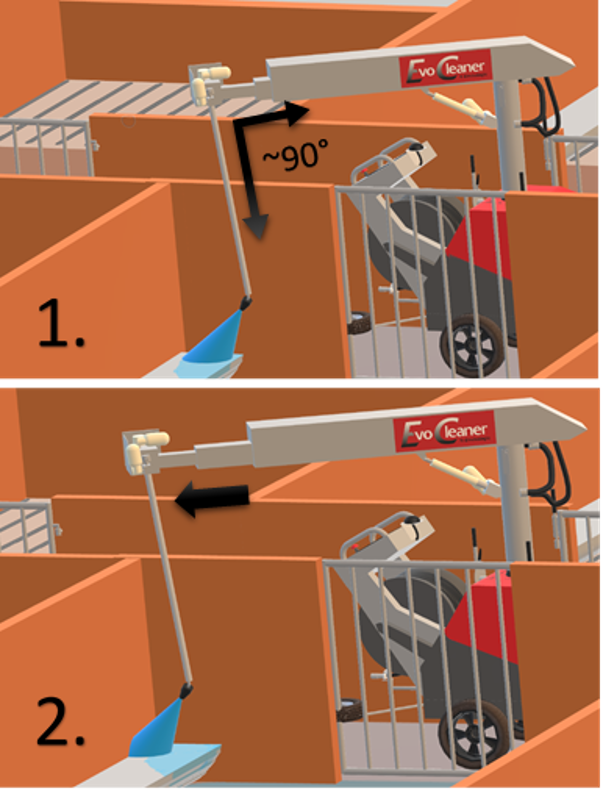
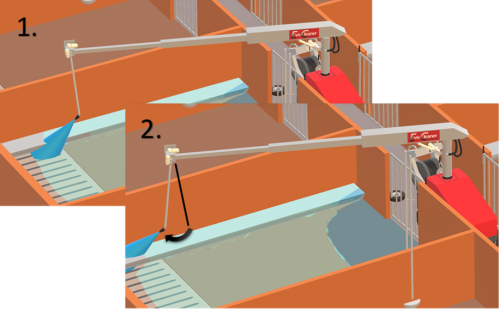
Step 1: Start by turning the tower 90° into the pen.
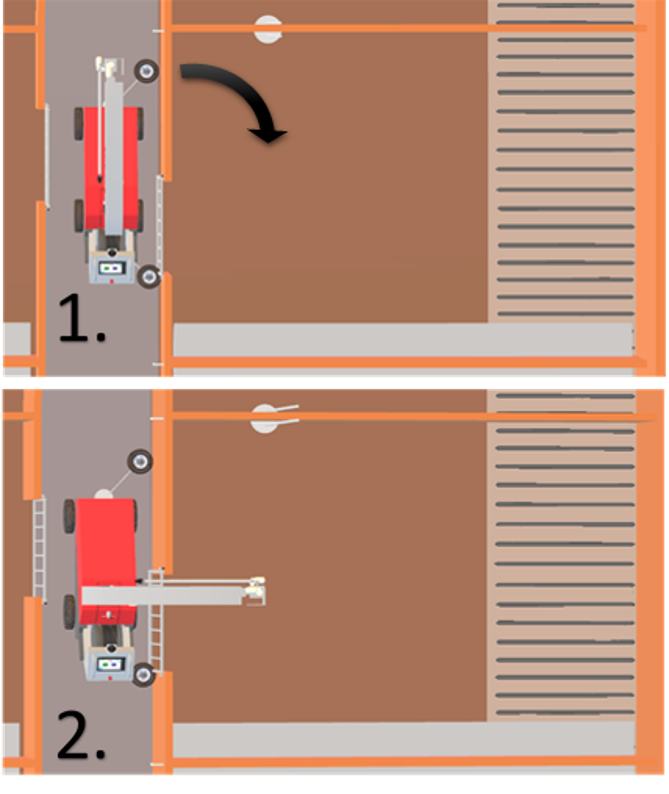
Step 2: Run the telescope out so the nozzle gets past the first wall.

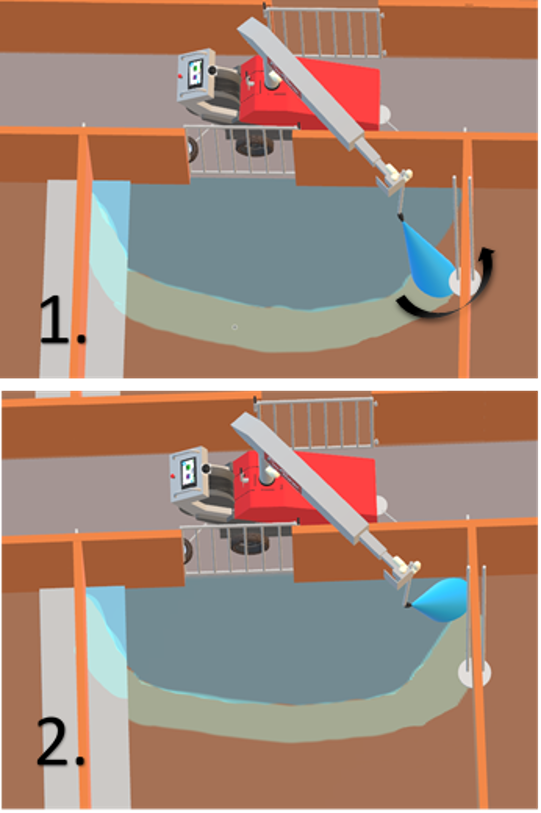
Step 3: Run the arm out to 45° and turn then the water on from the joystick. These three steps are standard procedures no matter what type of pen you have.
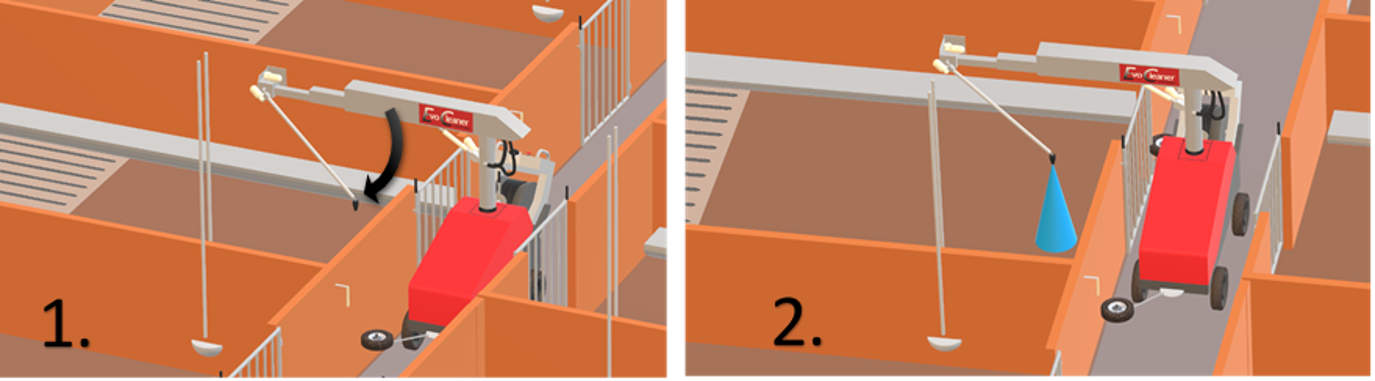
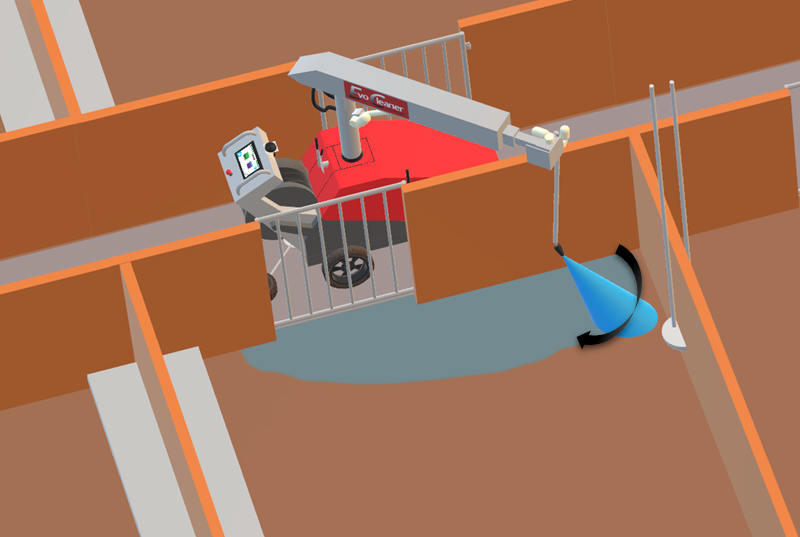
Step 4:Start by placing the nozzle close to the first wall, pull the telescope in (have good margins between the nozzle and the wall). Then do the first “circle”. Turn the nozzle fully to each side.
Information: The following steps is examples based on this pen type. Your pens might need another solution, but you can still apply these basic patterns to any pen type. Start from the side where you can push the dirt towards the slat. These illustrations push the dirt away from the robot towards the slat.
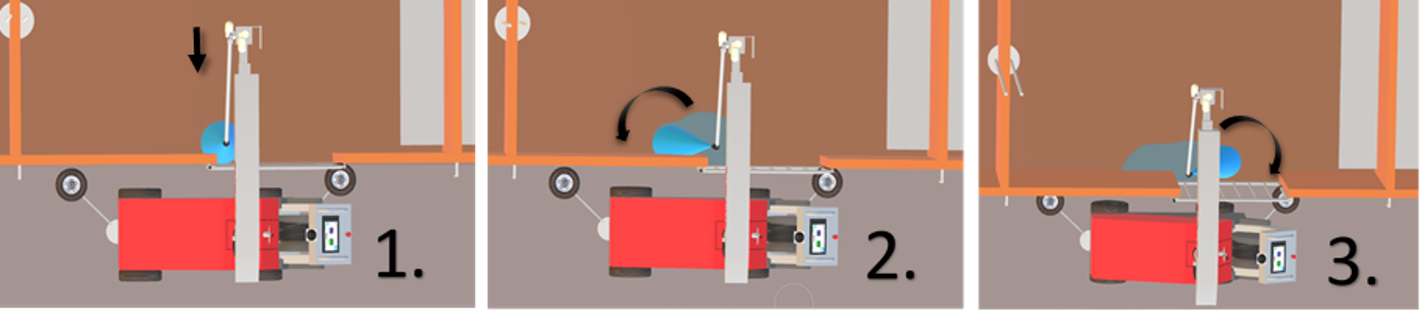
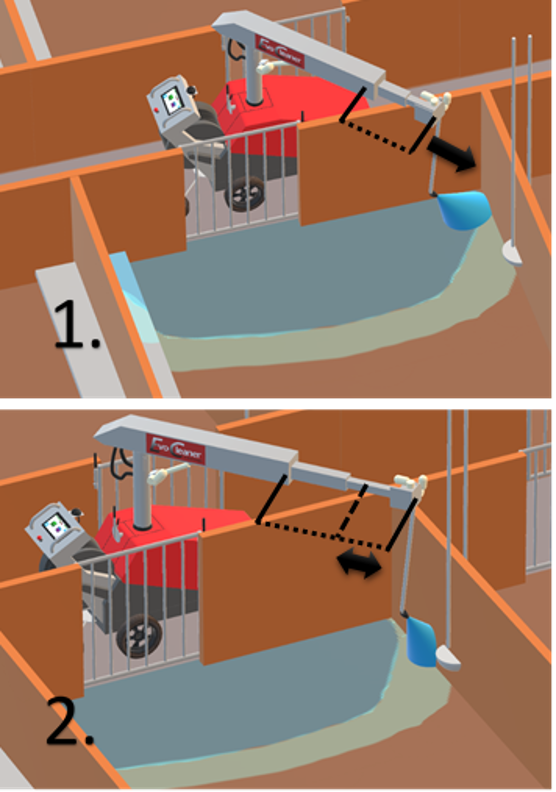
Step 5: Move the arm one “step” out so you can start a new circle. Make sure that you don’t move the arm too much. It could lead to a missed line of dirt.
Step 6: Turn the tower towards the wall. This is the start of the tower sweep.

Before we moving on, the next few steps will be a lot of tower sweeps and rotation with the nozzle. Imagine it being as a switchback/snake road.

Credit: @CalinStanPhotography
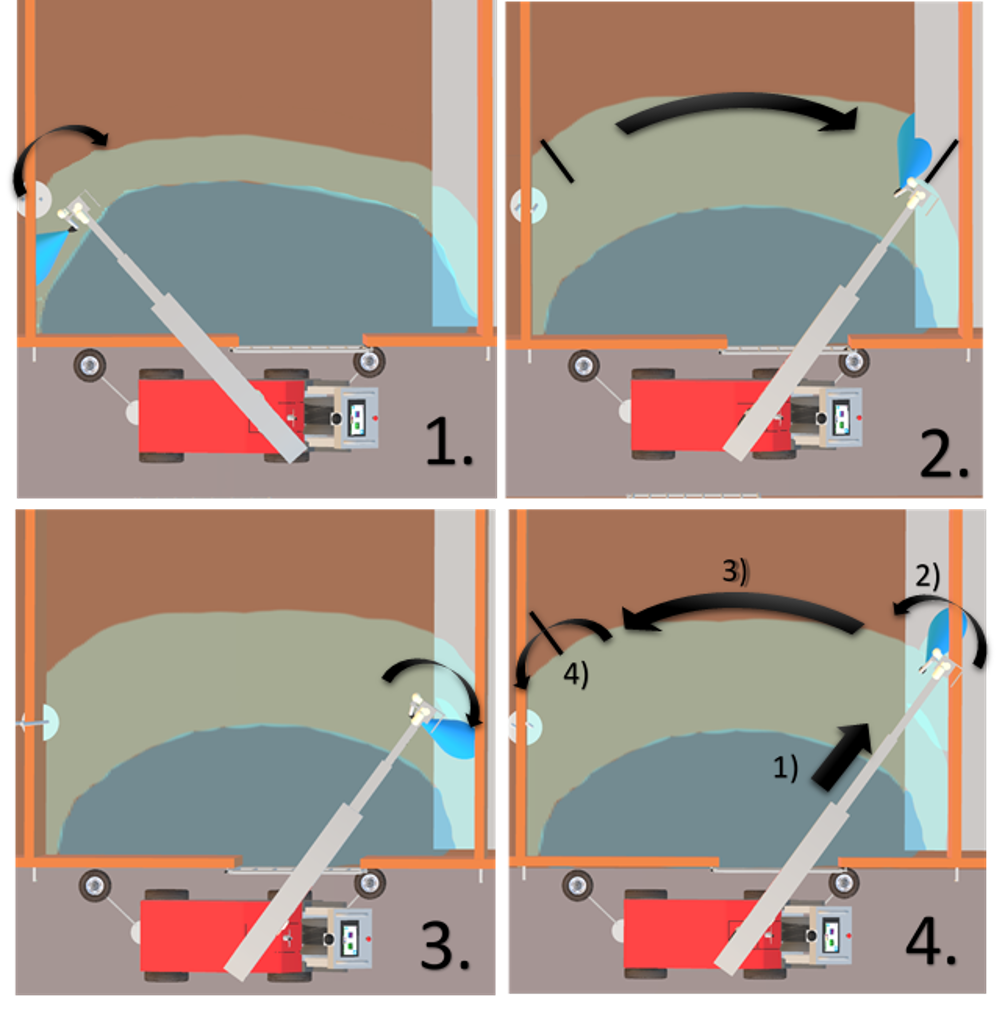
- 1. Turn the nozzle straight away from the robot/down (or towards the robot, depending which way you are pushing the dirt). Keyword, nozzle straight.
- 2. Sweep with the tower when nozzle is straight. Stop the sweep with good margins to the wall.
- 3. Always end the sweep with the nozzle outwards.
- 4. Then run one “step” out with the arm while the nozzle still points outwards.
- 5. Turn the nozzle straight (due to water pressure, this is the safest and most ergonomic way for the tower motor to turn the tower).
- 6. Then do another sweep with the tower towards the other wall.
- 7. End with nozzle outwards.
- 8. Go out another “step” with the arm.
- 9. Turn the nozzle straight.
Then repeat this procedure a few times until the arm is about 90° to the boom. This is where you will have a good angle on the water, so you can push the dirt towards the slat.
The following pictures will demonstrate these steps.
Once again, as a remainder: Do not turn the tower when the water/nozzle is sideways! The water pressure will effect the towers electric motor and could lead to alarm. Do always have the water/nozzle straight/parallel with the tower/telescope before turning the tower.
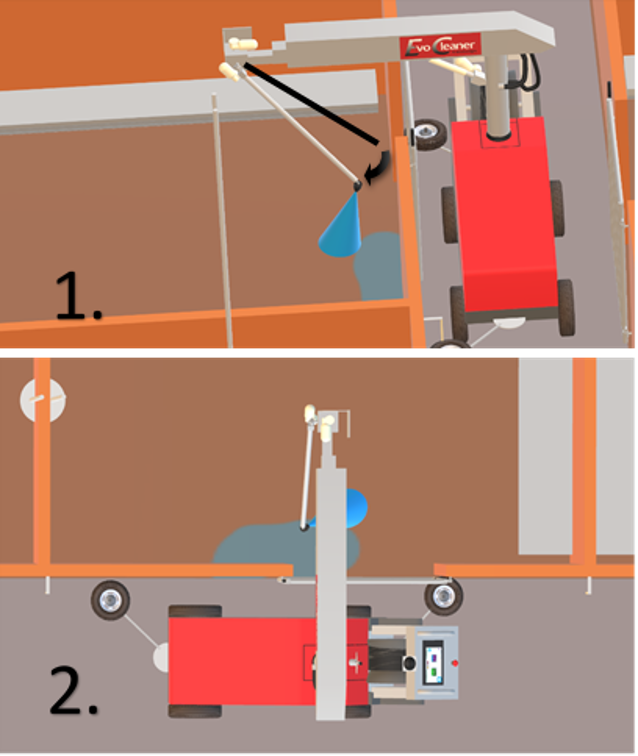
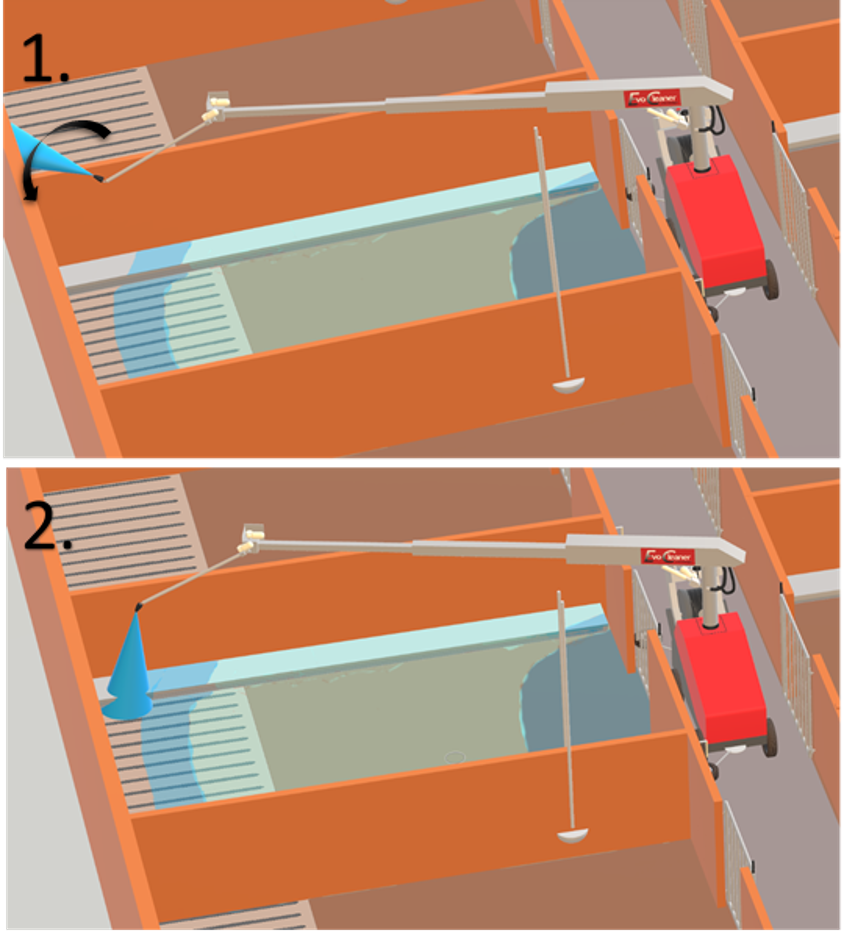
Step 7: Turn the nozzle straight and then sweep the tower towards the other side. Don’t go too close to the wall with the nozzle.
Step 8: End the sweep with the nozzle outwards, towards the wall. When turning the nozzle, exaggerate the movement and do the nozzle motion a bit “too long”. When the robot runs this program automatically, the movement of the nozzle could be a bit shorter due to the smoothening motions the robot does.

Step 9: When one sweep is made and ended with nozzle outwards, move the arm out one more “step” to take a new position. Remember, don't do too long movements when running the arm out one “step”. That will lead to a missed line of dirt.

Step 10: When the arm has a new position, rotate the nozzle so it points straight away from the robot (if you started from the far side of the robot and want to push the dirt towards the robot, the rotate the nozzle towards the robot). Adjust the arm if you notice that you moved the arm too long. You can also adjust the height with the boom if you want a wider spray (boom up) or more impact on the dirt (boom down).
Step 11: When the nozzle is pointing straight, you can sweep the tower to the opposite wall. Stop the sweep with great margins to the wall.
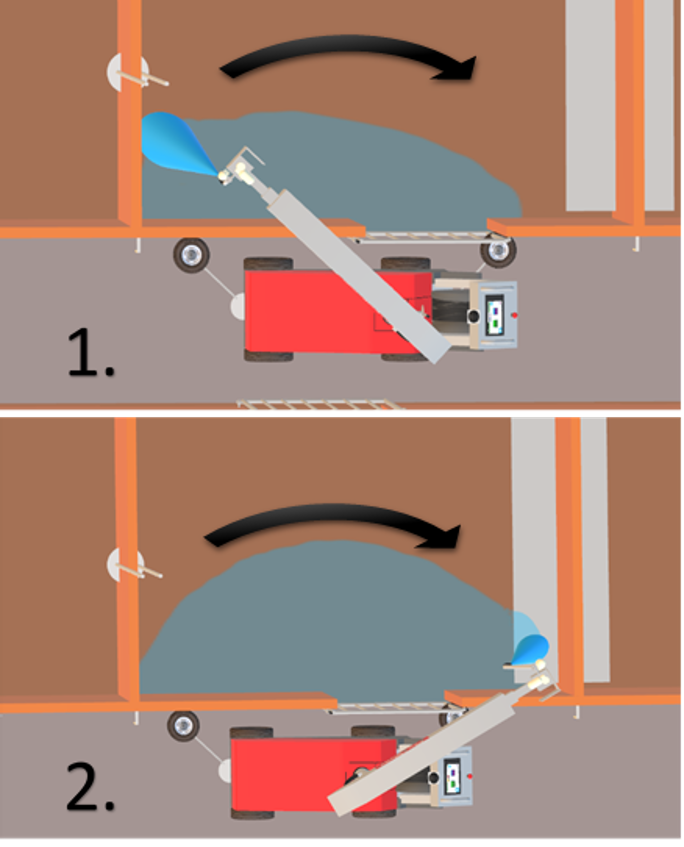
Step 12: End the sweep by rotating the nozzle outwards, as you should do at the end of every sweep. This makes it possible to keep good margins to the inventory but also for reaching the last dirt on the floor against the wall.
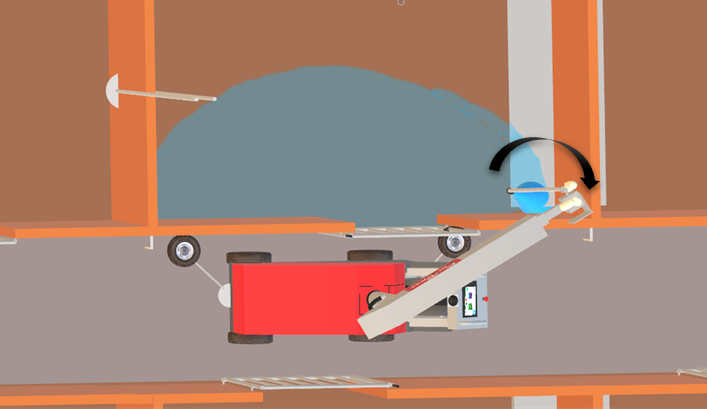
Step 13: <font 12pt/inherit;;inherit;;inherit>Keep doing these sweeps, one “step” at the time until you have approximately 90° on the arm in relation to the boom. That will give you a good angle on the water.</font> When the arm is 90°, keep it in that position. Instead of driving the arm out, now run the telescope out one “step” with the nozzle sideways (as always). Keep in mind, don’t go too long with the telescope so you miss a line of dirt.
Step 14: When the telescope has a new position, rotate the nozzle so it points straight, then sweep with the tower towards the opposite side. Stop the movement with great margins to the inventory.

Step 15: When you have stopped the motion of the tower, once again, end with the nozzle outwards.
Step 16: Run the telescope out one “step” to take a new position. As always, the nozzle is supposed to be sideways during this procedure.
Step 17 (summary): The next following movements are standard motions that you’ll have to repeat until you’ve covered the whole floor or as far as you can reach with the telescope.
When the telescope has a new position (step 16);
- Rotate the nozzle so it has the same direction as the tower/telescope.
- Sweep the tower to the other side of the pen. Stop the motion of the tower so you have great margins to the wall.
- Then rotate the nozzle outwards as a finish of the sweep.
- Then repeat what you’ve just learned.
- 4. 1) Take a new position with the telescope while the nozzle is sideways.
- 4. 2) Rotate the nozzle so it's straight.
- 4. 3) Then sweep with the tower.
- 4. 4) Finish of by rotate the nozzle outwards.
- 4. 5) Repeat again.
Dark blue = Where the arm runs one “step” at the time (until the arm is about 90º).
Light blue = Where the telescope runs one “step” at the time (as far as it can reach) while the arm remained in the same position the entire time.
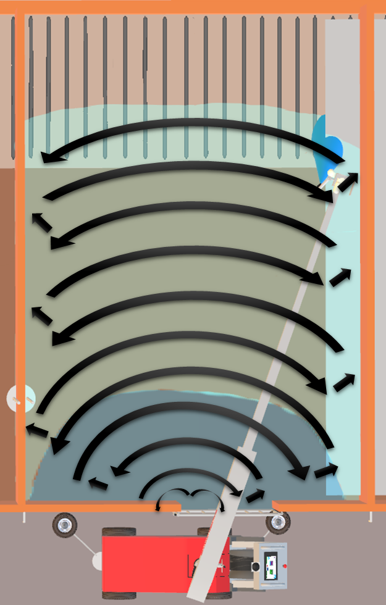
Has the telescope reached as far as it can but you need to reach even further? Then run the arm out again one “step” at the time followed with the tower sweeps.
The following step (step 18-20) will show you this.
Step 18: When the telescope has reached maximum length, run the arm out one “step” (with nozzle sideways, against the wall).
Step 19: Still same process. Once you have stepped one “step” out, run the nozzle so it's straight/parallel with the telescope/tower, then run the tower to the opposite side. End the sweep with nozzle outwards (as always)

Step 20: Continue with arm out and sweep with tower until the arm is in a position where the water loses its impact on the floor. Then run the nozzle all around so the water goes down towards the floor and continue out with the arm to a position so you can continue with the tower sweeps.
<font 12pt/inherit;;inherit;;inherit>Adjust the distance to the floor with the boom if you want to get closer/further away. Then sweep with tower. The more you run the arm out, the further away from the floor you get. Adjust the height with boom downwards.</font>
<font 12pt/inherit;;inherit;;inherit>To reach the back-wall corner you might have to have the boom/telescope/arm in a diagonal position downwards for maximum reach. As always, take a new position, make a sweep, end with nozzle outwards.</font>
If your robot is equipped with the double nozzle you can reach up to 6 meters. Go to the double nozzle instruction to see how to use it.
These are the basics for a floor program. Take these principles and adapt them to your pen.